I am interested in a basic setup kit or list of essential items to form my own kit from.
I see some on Amazon that are carried all over and also StewMac has some. The contents vary.
Metric or American?
This is all new to me so any comments are appreciated.
Thank you in advance.
Basic Setup Kit Recommendation
-
yowhatsshakin

- Posts: 3340
- Joined: Tue Feb 09, 2010 8:00 am
- Location: Seattle
Re: Basic Setup Kit Recommendation
Hi Michael,
Depends a bit on what year of G&L your servicing. You can find the list of Allen wrenches in the Tech Tips section of the Knowledgebase. Beyond the wrenches, your kit should contain:
- Jos
Depends a bit on what year of G&L your servicing. You can find the list of Allen wrenches in the Tech Tips section of the Knowledgebase. Beyond the wrenches, your kit should contain:
- String winder
- straight edge
- gauge feeler (or one of these nice setup gauges you can get at StewMac)
- Phillips screwdriver for neck bolts (and screws in spring cavity of DFV models)
- Phillips screwdriver for screws for the pickguard
- small wedge cur to correct thickness so you can fix a DFV when changing strings (or you can use your gauge feeler for that)
- Jos
-
KenC

- Posts: 2344
- Joined: Thu Feb 17, 2011 7:18 pm
- Location: None of the above
Re: Basic Setup Kit Recommendation
I agree with Jos's recommendations. My setup kit is for the most part borrowed from the tools I use to set up woodworking equipment:
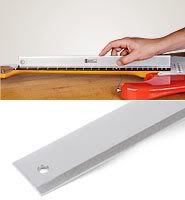
1. I use an 18" precision straight edge. The 18" length lets me check relief from the 1st to the 22nd frets while the guitar is tuned to pitch. Since G&L fingerboards are about 18.5" from nut to 22nd fret, I don't have to worry about clearing the top of the neck pickup. The type of straightedge used to set up shop tools works well, as it is thin enough to fit between the strings but thick enough that it doesn't flex.
2. I use a screwdriver with interchangeable tips, so it works for the neck bolts/vibrato screws as well as the pickup height screws.
3. Instead of feeler gauges, I just use Dunlop Tortex picks (which are smooth on both sides). This isn't precise, but it gives a good enough approximation for my preferences. I also never have a shortage of them lying around the house.
4. For wedging the DFV, I cut a slice of wood about 1/8" thick on my table saw. I wrap this with a piece of cloth from an old tee shirt, so it ends up being the correct 3/16" thickness for all of my guitars (recent G&Ls need a thinner shim). This really protects the finish well.
I hope this is helpful.
Ken
-
louis cyfer
- Posts: 3011
- Joined: Tue Oct 25, 2011 2:58 pm
Re: Basic Setup Kit Recommendation
what is it that you want to do. set up as in intonation, action, relief? or fret level, crown, polish, etc? what tools do you already have?
-
Michael-GnL-Michael
- Posts: 744
- Joined: Wed May 18, 2011 8:24 pm
Re: Basic Setup Kit Recommendation
.
To start off I would be setting intonation and action.
Initial impressions of adjusting neck relief admittedly scare me.
I need to read about it but I would like to know what tools would be required.
I would not try many things without having a guinea pig guitar to practice on.
Thanks to everyone for taking the time to respond.
.
-
KenC
- Posts: 2344
- Joined: Thu Feb 17, 2011 7:18 pm
- Location: None of the above
Re: Basic Setup Kit Recommendation
Michael,
For intonation and action (without changing the neck relief) you would need whatever size Allen wrench fits your bridge saddles, and the proper size screwdriver for your intonation screws. And of course a tuner - the more stable and accurate, the better. The tuner is really the most important tool, IMO. I've been using a cheap case tuner, and every time I tweak a guitar's intonation I decide that a good pedal tuner needs to be my next purchase.
I understand your apprehension about neck adjustments. I was pretty casual about taking the necks off of my Fenders in my younger days, but was very reluctant to do anything that could hurt my G&Ls. I eventually had to make adjustments when I bought my '82 SC-2, as it was borderline unplayable. I bought a thoroughly trashed out Duo Sonic reissue to practice on, but that became a project guitar instead of a practice piece. Anyway, by following the setup instructions from the G&L Gallery I was able to get the SC-2 into prime condition in about an hour (DISCLAIMER: a 1/16" piece of the finish had adhered to the neck more than the body, and lifted off during neck removal). The only place I deviated from the instructions was using the 18" precision straightedge instead of two capos to check neck relief.
Ken
-
louis cyfer
- Posts: 3011
- Joined: Tue Oct 25, 2011 2:58 pm
Re: Basic Setup Kit Recommendation
doing your action without adjusting the relief can throw you off, and cause a lot of frustration. if you have too much relief and you set your action at the 12th fret, you'll have really high action at 5-8 frets.
ototh if yo have too little relief, or a backbow, you'll have a really high action by the time you get the buzzing out. all you need is the feeler gauges to set the relief. for the intonation screw, you want a long Philips screw driver, so the handle is off the body when adjusting the set screw. that way you don't have to worry about nicking the guitar up, or messing up the screw head from trying to go at an angle.
you don't need a straight edge for the relief, just one capo. the string is perfectly straight under tension. btw, i set my relief to a lot less than recommended. it just plays better that way. i believe darwin does the same thing. as far as the allen wrenches, those should have come with the guitar. and there you have it. remember it is always relief, action, intonation, in that order.
-
Michael-GnL-Michael
- Posts: 744
- Joined: Wed May 18, 2011 8:24 pm
Re: Basic Setup Kit Recommendation
So there is no mistaking one thing for another, do I have to the correct ideas here?
(EDIT: I forgot but I will track down a good tuner. I do have software tuners in two Amp SIM programs and my TC Electronic audio interface. Are these good enough?)
I have the Allen wrenches that came with the guitars, various screw drivers, wire cutter, string winder, etc.
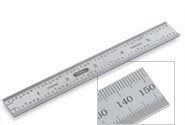
The "feeler gauge" suggested more than once is the item I am the least clear on. A feeler gauge often indicates a gauge that is physically used to represent the exact distance needed as opposed to one used primarily for measuring like a ruler. There are several on the StewMac website:
A. String Action Gauge
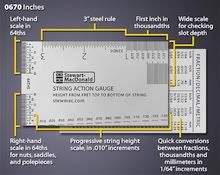
B. Feeler Gauge

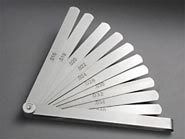
C. Steel Rule
D. Under-String Radius Gauge
I am planning on switching to noiseless pickups on my Legacy. I am thinking these would be useful to adjust the poles. I guess I could just use a radius gauge, even the paper cutouts downloaded online for this with less convenience?
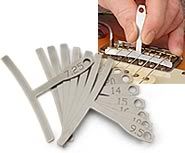
E. Straightedge
This has notches for the frets. As much as it is a well-designed tool I don't think I will be using it enough to justify the expense.
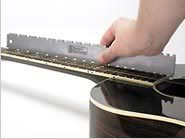
This style is probably the most commonly used straightedge.
(EDIT: I forgot but I will track down a good tuner. I do have software tuners in two Amp SIM programs and my TC Electronic audio interface. Are these good enough?)
I have the Allen wrenches that came with the guitars, various screw drivers, wire cutter, string winder, etc.
The "feeler gauge" suggested more than once is the item I am the least clear on. A feeler gauge often indicates a gauge that is physically used to represent the exact distance needed as opposed to one used primarily for measuring like a ruler. There are several on the StewMac website:
A. String Action Gauge
B. Feeler Gauge
C. Steel Rule
D. Under-String Radius Gauge
I am planning on switching to noiseless pickups on my Legacy. I am thinking these would be useful to adjust the poles. I guess I could just use a radius gauge, even the paper cutouts downloaded online for this with less convenience?
E. Straightedge
This has notches for the frets. As much as it is a well-designed tool I don't think I will be using it enough to justify the expense.
This style is probably the most commonly used straightedge.
-
darwinohm
- Posts: 3218
- Joined: Mon Mar 01, 2010 1:13 pm
- Location: Minneapolis/St Paul
Re: Basic Setup Kit Recommendation
Michael, you have identified most of the tools that you would need for doing a good setup. The sequence of how things are done is as important as the set up. Here is the sequence of the adjustments that I do
The Trem height should be set to factory spec (see manual) before doing any setup adjustments.
1. Change strings if you plan on doing so. If you change the gauge, the adjustments may change just from a different gauge. On a DF equipped guitar, I use a small piece of cardboard under the rear of the DF before removing the strings. This will prevent damage to the paint/body.
2. Neck relief with the straight edge should be checked at the 7th or 8th fret under the low E string. I like low action and like .005 to.006 in. of relief (feeler gauges). After a good setup, this is the only adjustment that you will have to check more frequently than the others. For more relief, turn the truss screw counter clockwise and for less relief turn it clockwise. If you truss nut does not move easily, reduce the string tension and adjust . Truss rod adjustments will normally be made in small increments (1/8) or less. If a truss rod nut does not turn without a lot of pressure or feels locked up, have it checked by a tech. Also keep in mind that the truss rod only affects the neck from where it joins the body to the nut. The portion of the neck secured to the body does not adjust. That is why we measure the relief at the 7th or 8th fret.
3. Adjust you string height at the 12Th fret and adjust the saddles fir the low E and the high E for the height you like (Stew Mac string action gauge). I like .050 for the high E and .060 for the low E. After adjusting these two outside strings, use the appropriate radius gauge and adjust the remaining four strings just so they start to touch the radius gauge just in front of the bridge. It is important the the saddles a level going across the guitar and that both screws are making full contact with the bridge plate. If you have a saddle lock bridge, I recommend checking each saddle screw after the saddle lock screw has been tightened. A slight turn in will keep them from backing out and buzzing.
4. This is when the intonation adjustments should be made. I prefer to use a strobe tuner for this but an accurate tuner will do the job. Most people set the intonation at the 12 fret, but some set it for the proper note at a higher fret such as 18, the reasoning being that it may be a bit more accurate. The 12 th fret is fine for most of us. Do not press heavy on the string while checking. The string should just touch the 12 th fret for a clear tone. If the intonation is too high, the saddle needs too be moved rearward toward the strap pin. Conversely, if low, the saddle needs to be move forward toward the pickups. Check and adjust the string until it is correct and repeat on the rest of the strings.
5. After the previous adjustments have been made, visibly check again to make sure all the saddles are level going across and if you have a saddle lock bridge, this is the time to set the lock screw. After locking, I recommend turning each saddle screw inward a bit and that will keep them from backing out and buzzing.
6. Recheck you pickup height after making action changes. Use the pickup height spec supplied in your guitar setup manual as a starting point. . After making the pickup adjustments, I check the volume of each pickup through my amp to make sure that the volume levels of this pickups are equal. Some may prefer them different but I like to balance them.
After doing all of the above, you should have a sweet playing axe. After doing this a few times you will be a hot setup person. The only adjustment that I like to check monthly is the relief. I tweak the truss rod as needed and if it is always kept at the same adjustment, the other adjustments will not change nor need to be checked until another string change. Hope this makes sense. It is even better if it works for you. There is nothing like playing a guitar set up to your own liking.
Michael, I purchased the basic setup kit from Stew Mac a couple of years ago and highly recommend it. I see people adjust truss rods by looking down the neck and don't believe in that. I prefer to measure, then I know it is right.-- Darwin
-
louis cyfer
- Posts: 3011
- Joined: Tue Oct 25, 2011 2:58 pm
Re: Basic Setup Kit Recommendation
darwin, when people try to use a higher note for intonation (not the 18th fret though), they run into a problem. using the 19th fret harmonic and the 19th fret fretted note, the problem is that the harmonic is not exactly part of our tempered scale, which is what the frets represent, so if they get those adjusted to the same note, the rest of the guitar will be out of tune. the octaves are perfect, but the 5ths are a bit off from true tempered to equal tempered.
michael, you can make your own radius gauge for the strings from a stiff piece of cardboard, or even a plastic cutting board. remember, that the radius on the bottom of the strings will be different from the top, using the same radius gauge to test the fret board and to adjust the strings, you will be slightly off.
michael, you can make your own radius gauge for the strings from a stiff piece of cardboard, or even a plastic cutting board. remember, that the radius on the bottom of the strings will be different from the top, using the same radius gauge to test the fret board and to adjust the strings, you will be slightly off.
-
KenC
- Posts: 2344
- Joined: Thu Feb 17, 2011 7:18 pm
- Location: None of the above
Re: Basic Setup Kit Recommendation
I agree with the relief/action/intonation sequence, but for whatever reason I rarely find I need to adjust relief. I wonder if this may be a result of my preference for older instruments, i.e., that the necks have stabilized over 25-30 years. In any case, after the initial setup when I bring an instrument home I rarely see any change in relief over time.
For me, using a straight edge is a personal preference and matter of convenience. I use them a lot for woodworking, so they are a go-to tool for me. I agree that you would get the same result by capo. I never use a capo when I play, so I never have one close at hand.
Ken
For me, using a straight edge is a personal preference and matter of convenience. I use them a lot for woodworking, so they are a go-to tool for me. I agree that you would get the same result by capo. I never use a capo when I play, so I never have one close at hand.
Ken
-
darwinohm
- Posts: 3218
- Joined: Mon Mar 01, 2010 1:13 pm
- Location: Minneapolis/St Paul
Re: Basic Setup Kit Recommendation
Ken, the stability of the relief could be a result of the climate where you live. You probably have more/stable humidity.-- Darwin
-
KenC
- Posts: 2344
- Joined: Thu Feb 17, 2011 7:18 pm
- Location: None of the above
Re: Basic Setup Kit Recommendation
That could be part of it. We have very humid summers, but so far this winter has been warm and damp. Having been recently bitten by the G&L bug, this is the first Maryland winter for many of my guitars.
I just lost a fairly long response to Michael's last questions. Here is a recap of what I had written:
1. The feeler gauges in photo "B" are what you want for setups. They slide between the string and the fret. When your desired thickness of feeler gauge can just slip in without moving the string, you have the right gap. The ruler-type gauges can be extremely difficult to read on anything but the treble E string.
2. An "engineer's rule" should work well as a straight edge, and cost a lot less than a precision straight edge. Of course, you could also use a capo as Louis mentioned (that is, capo the first fret and hold the string down on the far side of the 22nd fret). If you use an engineer's rule, just be sure it's thick enough that it doesn't flex under its own weight. Remember that 18" is the only length that will work on a G&L neck.
3. I personally wouldn't see a use for the radius gauge in setting pole piece heights. I would let my ears be the judge of good volume balance across the strings. The radius gauge could be useful (if placed on top of the strings) for setting the bridge saddles to match the fretboard radius.
One other issue comes to mind, that hasn't been mentioned yet in this thread. If you take your neck off (e.g., to check production dates), make sure it seats fully into the pocket before you proceed with the setup. Do this by tuning the strings to pitch (it doesn't need to be perfect), and carefully backing the neck attachments screws off by a quarter turn. Don't worry, the neck won't fly off (I admit that image ran through my mind the first time I did it). It will just snug the butt of the neck down into the pocket due to the string tension. Then REALLY tighten the screws (as well as you can without stripping them). With the screws tightened down, you can proceed with the setup. This "seating" will prevent problems with tuning stability.
Ken
-
louis cyfer
- Posts: 3011
- Joined: Tue Oct 25, 2011 2:58 pm
Re: Basic Setup Kit Recommendation
never heard a radius gauge being used to set pole height. wouldn't actually be useful. as far as seating the neck back after taking it off, what is really important that the neckscrews go through the holes in the body freely. that is what makes sure the neck is tight to the body. the method you suggest makes a difference only if the screws were binding in the body. if that is the case, it is better to drill out the holes in the body to make sure the screws move freely.KenC wrote:That could be part of it. We have very humid summers, but so far this winter has been warm and damp. Having been recently bitten by the G&L bug, this is the first Maryland winter for many of my guitars.
I just lost a fairly long response to Michael's last questions. Here is a recap of what I had written:
1. The feeler gauges in photo "B" are what you want for setups. They slide between the string and the fret. When your desired thickness of feeler gauge can just slip in without moving the string, you have the right gap. The ruler-type gauges can be extremely difficult to read on anything but the treble E string.
2. An "engineer's rule" should work well as a straight edge, and cost a lot less than a precision straight edge. Of course, you could also use a capo as Louis mentioned (that is, capo the first fret and hold the string down on the far side of the 22nd fret). If you use an engineer's rule, just be sure it's thick enough that it doesn't flex under its own weight. Remember that 18" is the only length that will work on a G&L neck.
3. I personally wouldn't see a use for the radius gauge in setting pole piece heights. I would let my ears be the judge of good volume balance across the strings. The radius gauge could be useful (if placed on top of the strings) for setting the bridge saddles to match the fretboard radius.
One other issue comes to mind, that hasn't been mentioned yet in this thread. If you take your neck off (e.g., to check production dates), make sure it seats fully into the pocket before you proceed with the setup. Do this by tuning the strings to pitch (it doesn't need to be perfect), and carefully backing the neck attachments screws off by a quarter turn. Don't worry, the neck won't fly off (I admit that image ran through my mind the first time I did it). It will just snug the butt of the neck down into the pocket due to the string tension. Then REALLY tighten the screws (as well as you can without stripping them). With the screws tightened down, you can proceed with the setup. This "seating" will prevent problems with tuning stability.
Ken
-
Michael-GnL-Michael
- Posts: 744
- Joined: Wed May 18, 2011 8:24 pm
Re: Basic Setup Kit Recommendation
.
The radius gauge for setting pole height was my mistake.
Ken has described using the radius gauge for making a bridge saddle adjustment.
I had read about that somewhere but I confused it with adjusting the pickup poles when posting in this thread.
Thanks so much to all of you for sharing this information here.
.
-
KenC
- Posts: 2344
- Joined: Thu Feb 17, 2011 7:18 pm
- Location: None of the above
Re: Basic Setup Kit Recommendation
Louis,
The recommendation about loosening and retightening the neck screws comes directly from the 1983 G&L setup instructions in the Gallery. I omitted this step the first time I removed a neck, and definitely had trouble maintaining tuning. I could actually feel the neck move if I pushed on it.
I've seen some guitars where the mounting screws were drilled directly through the body and it was very possible for them to bind. I suspect G&L drilled a pilot hole all the way through the body, which allowed a little bit more play. In any case, that's how the setup was performed in the factory.
Ken
-
louis cyfer
- Posts: 3011
- Joined: Tue Oct 25, 2011 2:58 pm
Re: Basic Setup Kit Recommendation
i am aware that g&l recommended that step, in some guitars it didn't make a difference, in others it made a huge one. it depended on the size of the screw hole in the body. i check every guitar now if the screw just falls in right through the body as it should. i have tried that method on those guitars, but it no longer provided a benefit.KenC wrote:Louis,
The recommendation about loosening and retightening the neck screws comes directly from the 1983 G&L setup instructions in the Gallery. I omitted this step the first time I removed a neck, and definitely had trouble maintaining tuning. I could actually feel the neck move if I pushed on it.
I've seen some guitars where the mounting screws were drilled directly through the body and it was very possible for them to bind. I suspect G&L drilled a pilot hole all the way through the body, which allowed a little bit more play. In any case, that's how the setup was performed in the factory.
Ken