M 2500 Neck Project
Tue Jan 13, 2015 11:50 am
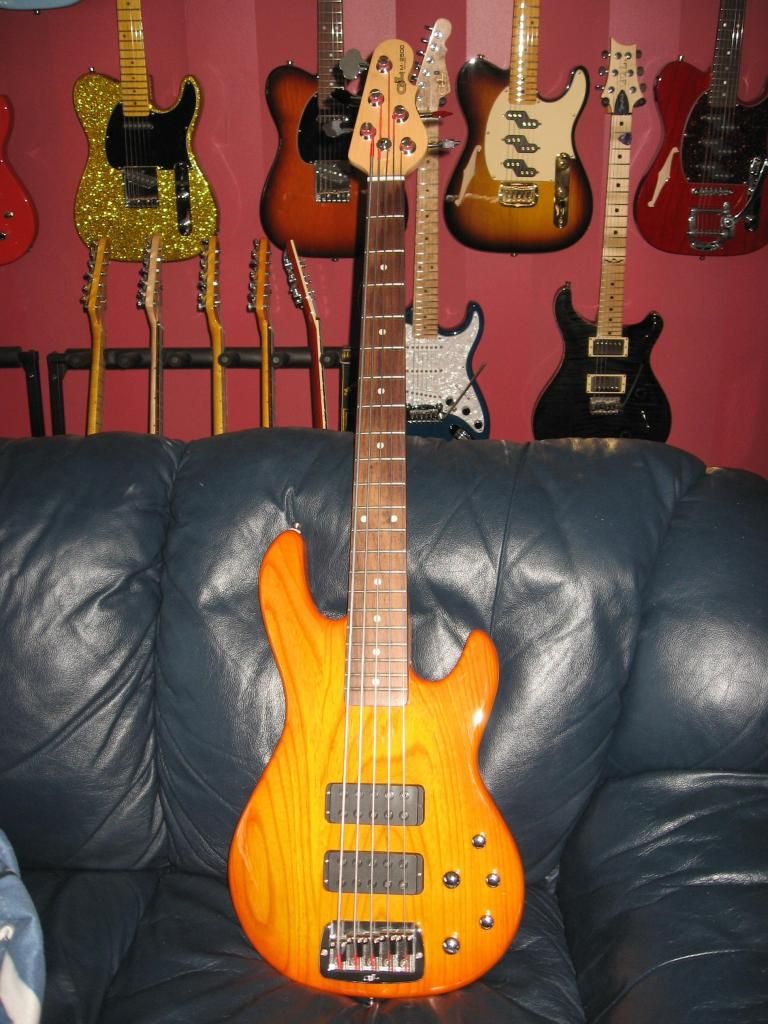
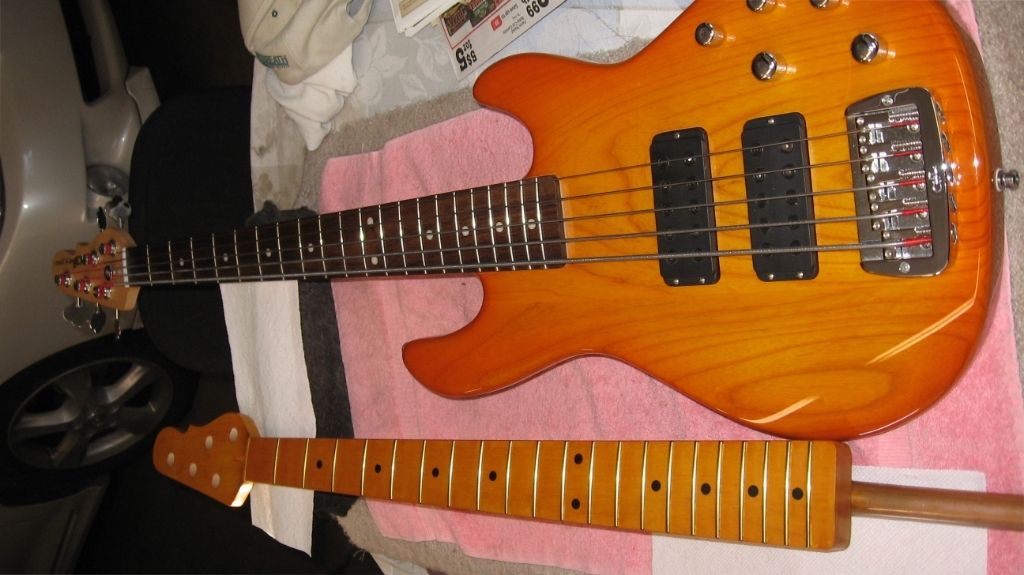
I have a M-2500 Tribute bass which is my main gigging bass. Last summer they were offering necks in the G&L store and I wanted a maple fingerboard. I also prefer high gloss finish. I must add that the original neck on this bass is now highly polished on the back of the neck foem playing a lot this past year. This bass has survived a year of hard gigging with no damage or scars, just a glossed up neck. So much for satin necks. First of all, here is the bass the neck is going on.
 [/URL
[/URL
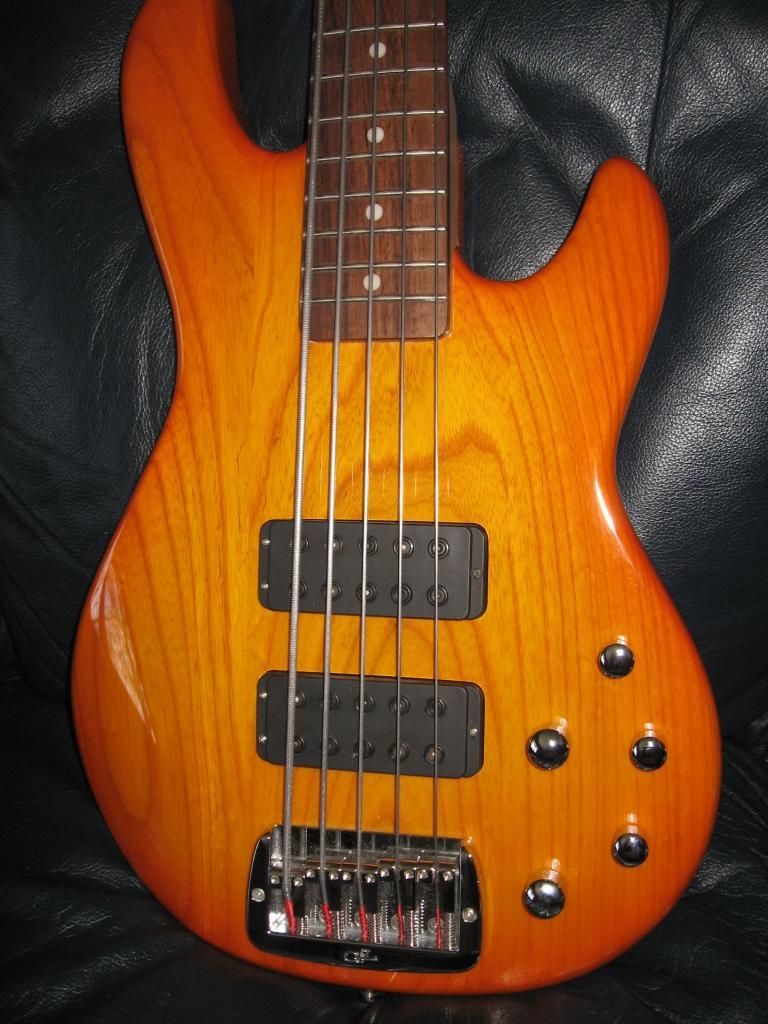
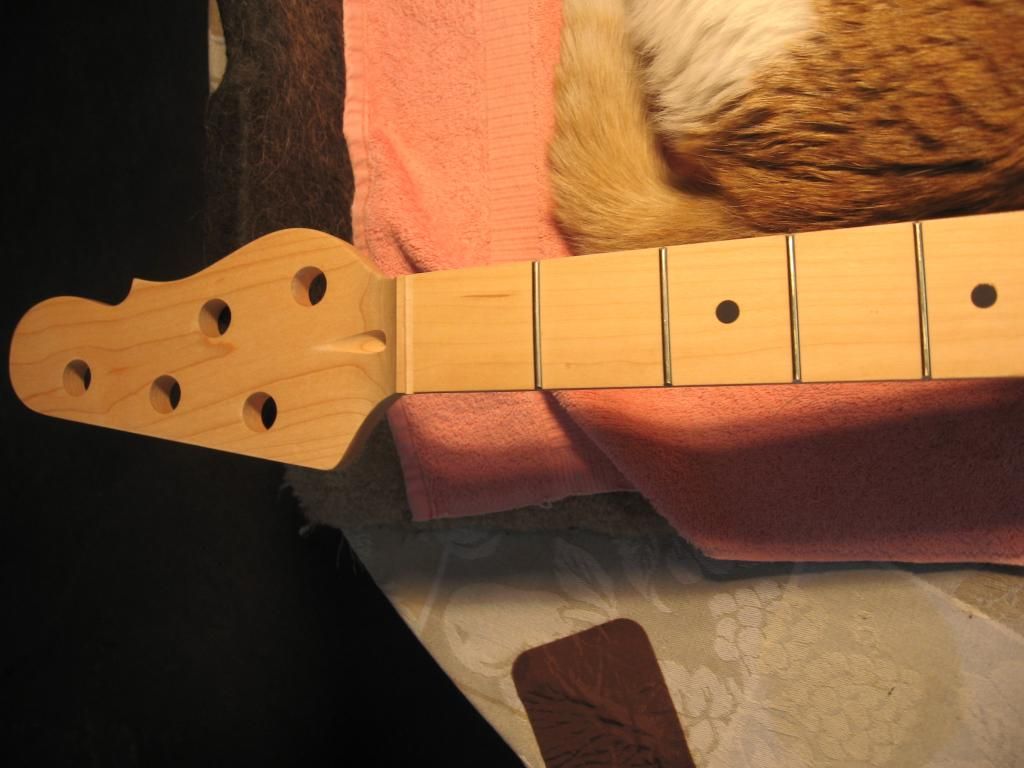
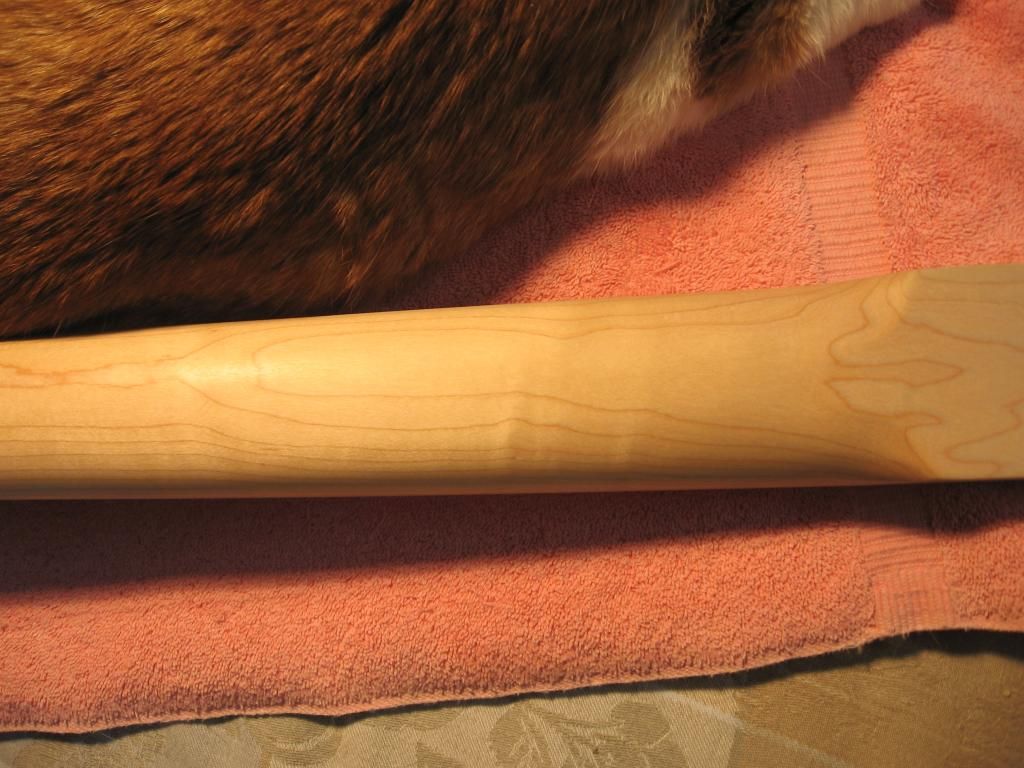
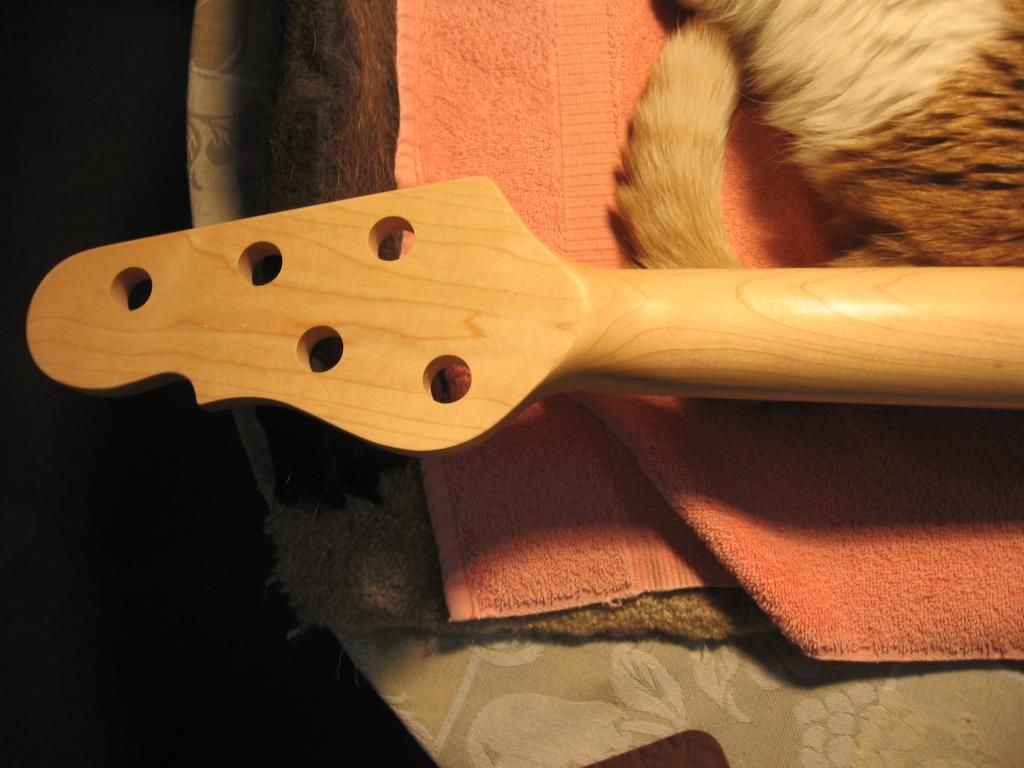
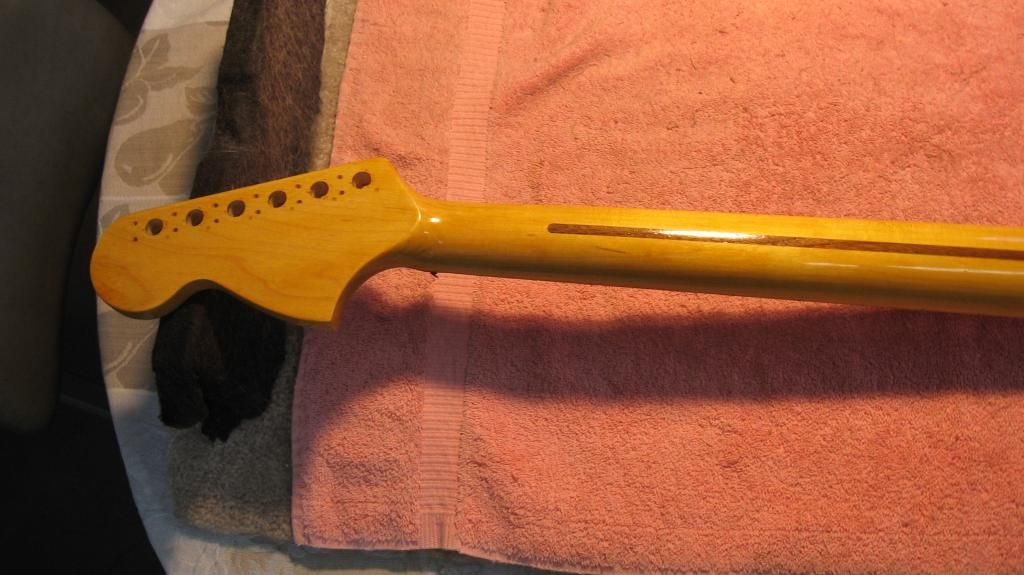
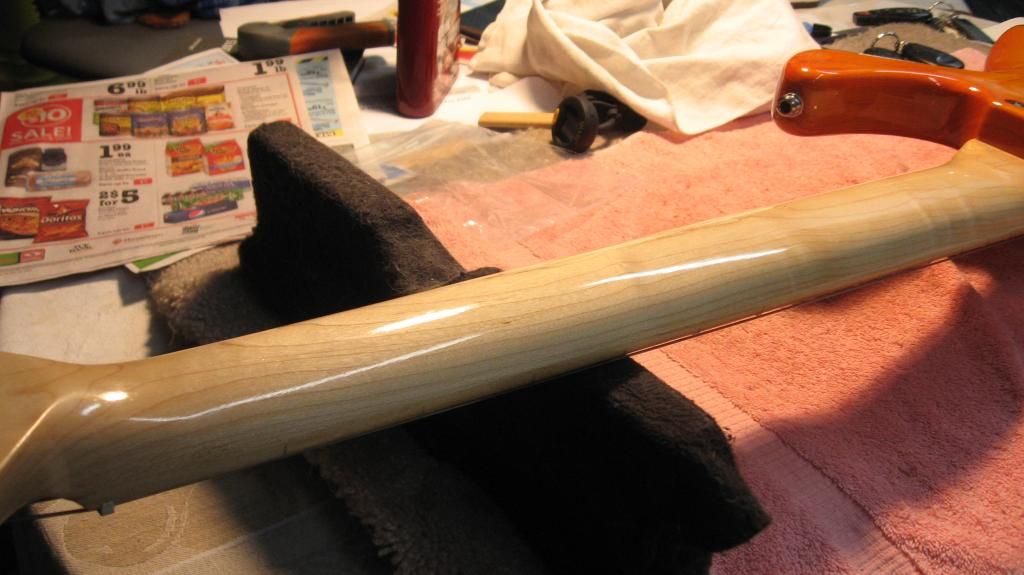
Now for the neck. This neck is spectacular. I have had it sitting in the garage in very low humidity to get it to shrink a bit before doing the fret dressing. The truss rod works beautifully and I have filed the the fret edges so they can no longer be felt. I also adjusted the fretboard to level and checked the frets for being level. They are, almost as it has been pleked. I am also happy with the grain of the neck and it is going to be a fine looking neck. I am going to use a stain to get the old vintage tint that G&L used to have, a nice orange yellow tint. I will use a water base stain to accomplish that. The headstock top will be sprayed gloss black. Next it will get many coats of Birchwood Casey Tru Oil, designed for gun stocks. I have used it before and it is my favorite especially in the winter as no spraying is required. It will then get the fine sanding and hand rubbing treatment to look like a mirror. I may seem a bit confident but I believe the water base stain will work. We will see. I will post some pics as things progress. I would love to have a plain silver or gold G&L logo to apply but I am afraid that wouldn't be well received. So here are some pics before I start and I will keep you updated as things progress. -- Darwin
[URL=http://s1237.photobucket.com/user/darwinohm/media/IMG_2857_zpseedc253e.jpg.html]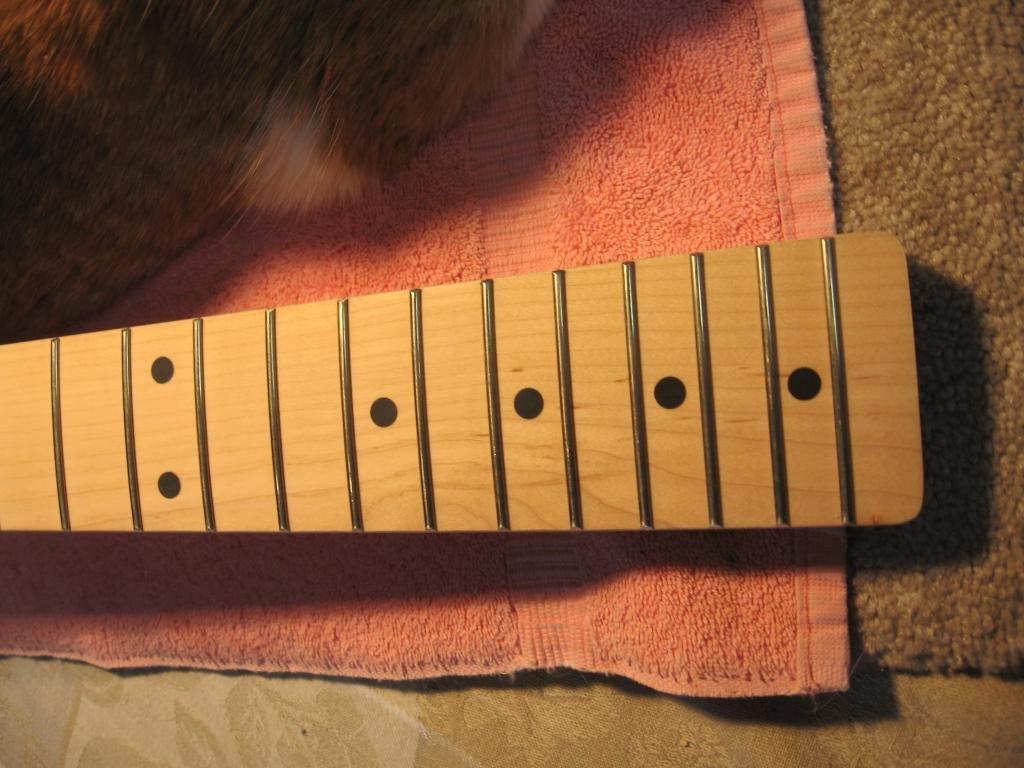
Edit, I have no idea why some of the text has lines under it. Someone clue me in! -- Darwin

 [/URL
[/URLNow for the neck. This neck is spectacular. I have had it sitting in the garage in very low humidity to get it to shrink a bit before doing the fret dressing. The truss rod works beautifully and I have filed the the fret edges so they can no longer be felt. I also adjusted the fretboard to level and checked the frets for being level. They are, almost as it has been pleked. I am also happy with the grain of the neck and it is going to be a fine looking neck. I am going to use a stain to get the old vintage tint that G&L used to have, a nice orange yellow tint. I will use a water base stain to accomplish that. The headstock top will be sprayed gloss black. Next it will get many coats of Birchwood Casey Tru Oil, designed for gun stocks. I have used it before and it is my favorite especially in the winter as no spraying is required. It will then get the fine sanding and hand rubbing treatment to look like a mirror. I may seem a bit confident but I believe the water base stain will work. We will see. I will post some pics as things progress. I would love to have a plain silver or gold G&L logo to apply but I am afraid that wouldn't be well received. So here are some pics before I start and I will keep you updated as things progress. -- Darwin
[URL=http://s1237.photobucket.com/user/darwinohm/media/IMG_2857_zpseedc253e.jpg.html]


Edit, I have no idea why some of the text has lines under it. Someone clue me in! -- Darwin
Re: M 2500 Neck Project
Sat Jan 31, 2015 3:07 pm
I have been away from this for a couple of weeks but have collected the materials to dye. I purchased 3 bottles of dye. Orange, Amber and Honey Amber. These a totally transparent and can be mixed with water which is what I used for my color test today. They will be applied to the wood with denatured alcohol on the actual neck.
First off I like the GOT that G&L used to use. They are darker and some have a lot of Orange. Here are two examples.
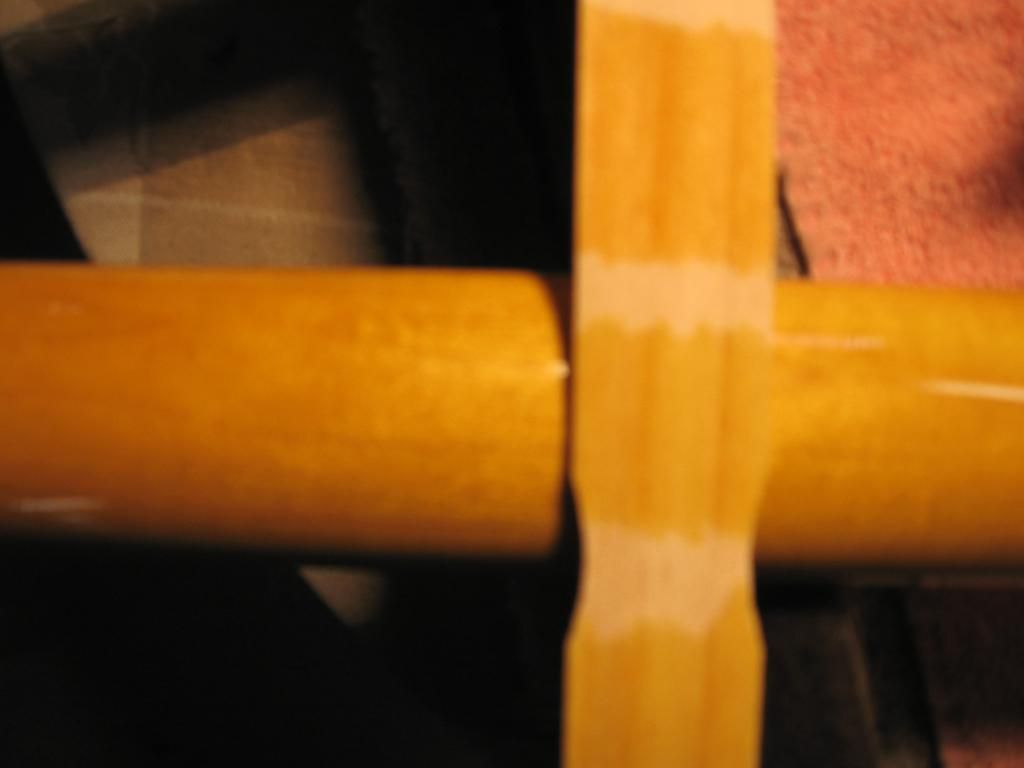
The upper neck having considerably more orange than the lower. The first task was to try the dyes and tint the last one to my approximate color to be used. This was done on a wood paint stick. It will give us an idea of the final tint. Here is the stick.
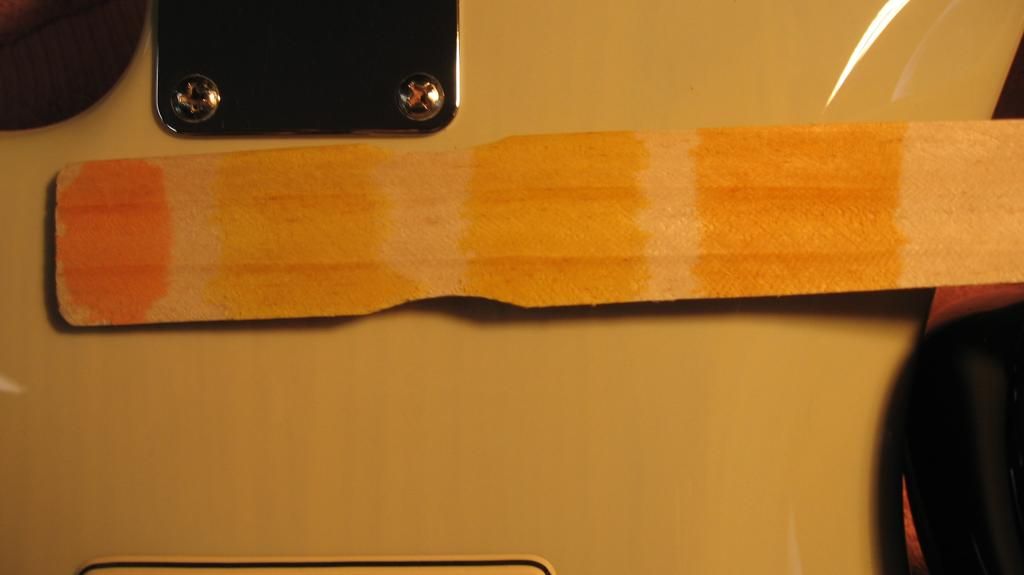
On the left is Orange, next is Amber, then Honey Amber and the last is Honey Amber with a bit of Orange for tint.
Next I matched the stick to the individual necks. First, the Honey Amber is very close to the bottom neck in the first picture.
The Honey Amber with the Orange mixed in matches the top neck with the most Orange very well. Here it is.
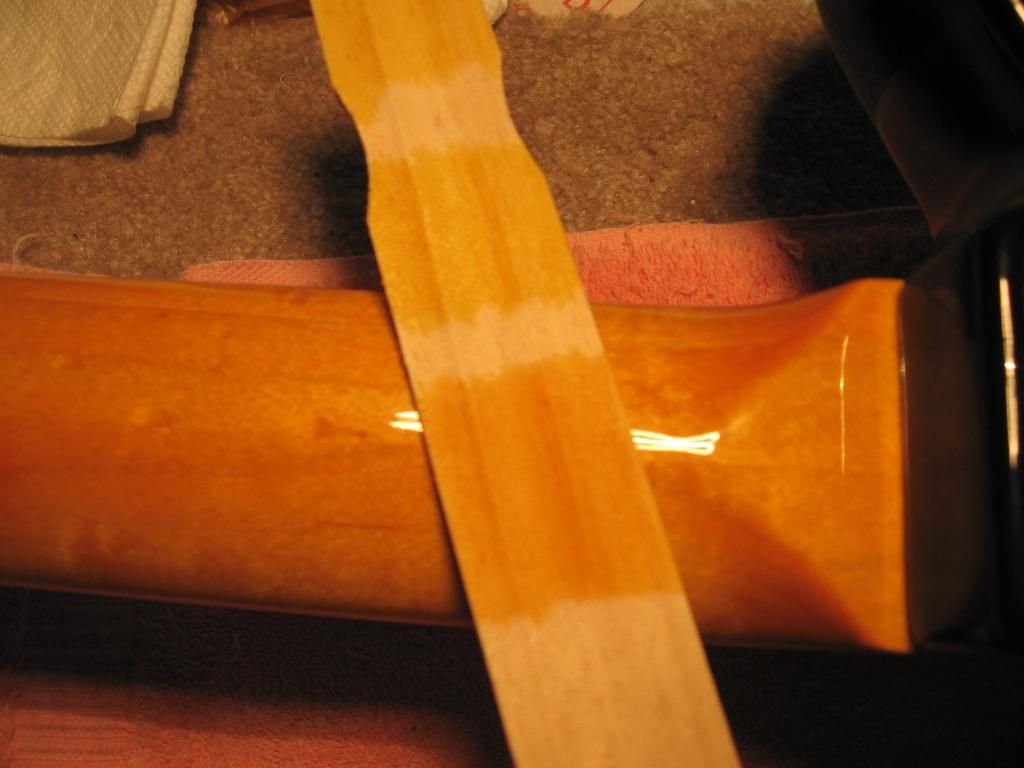
This is very close to a lot of the old time GOT's.
Next I checked the Honey Amber with Orange tint against my L-2500 body. The results are great. Here it is, the tint on the left side of the stick.
Now this is starting to become fun and I am in the mood to get going. I plan to match the neck to the bass. I may do a burst headstock to match the body or may do a black head stock. I will consult Ginny. What do you think?
I have not done this process before but it is going to be fun. I would love to dye a quilted body using a black first, sanding and then the final color dye. That would really enhance the grain. Anyway, stay tuned for progress as it happens over the somewhat near future. I am using Birchwood Casey Tru Oil for the final finish but poly would also work well as would lacquer. If the dye ends up a bit to dark it can be sanded to the proper tone. I may use an airbrush for the burst on the headstock. Depends-------- Darwin
First off I like the GOT that G&L used to use. They are darker and some have a lot of Orange. Here are two examples.

The upper neck having considerably more orange than the lower. The first task was to try the dyes and tint the last one to my approximate color to be used. This was done on a wood paint stick. It will give us an idea of the final tint. Here is the stick.

On the left is Orange, next is Amber, then Honey Amber and the last is Honey Amber with a bit of Orange for tint.
Next I matched the stick to the individual necks. First, the Honey Amber is very close to the bottom neck in the first picture.

The Honey Amber with the Orange mixed in matches the top neck with the most Orange very well. Here it is.

This is very close to a lot of the old time GOT's.
Next I checked the Honey Amber with Orange tint against my L-2500 body. The results are great. Here it is, the tint on the left side of the stick.

Now this is starting to become fun and I am in the mood to get going. I plan to match the neck to the bass. I may do a burst headstock to match the body or may do a black head stock. I will consult Ginny. What do you think?
I have not done this process before but it is going to be fun. I would love to dye a quilted body using a black first, sanding and then the final color dye. That would really enhance the grain. Anyway, stay tuned for progress as it happens over the somewhat near future. I am using Birchwood Casey Tru Oil for the final finish but poly would also work well as would lacquer. If the dye ends up a bit to dark it can be sanded to the proper tone. I may use an airbrush for the burst on the headstock. Depends-------- Darwin
Re: M 2500 Neck Project
Sat Jan 31, 2015 8:29 pm
Hi Darwin,
I'm really interested to see how this turns out. One suggestion though: try the tint on a scrap of hard maple before you put any on the neck. I haven't finished a guitar (yet), but I have learned from woodworking to test any penetrating finishes or tints on the same type of wood I am using for a project. I'm just thinking of the paint sticks I've used that were very soft, porous wood. You might get a bit less absorption into the bass neck, and end up with a lighter tint than you're expecting.
Out of curiosity, what materials do you use for the final hand polishing step?
Ken
Re: M 2500 Neck Project
Sun Feb 01, 2015 8:32 am
Ken posted
Excellent point which is easy to control. I will simply add an additional coat or two of stain depending on well it is absorbed by the maple. If i were to get too dark it can sanded a bit to lighten it up.
The final finishing is the fun part as it just gets wow when you hand buff it. I will apply about 10 coats of Tru Oil and then wet sand with 600, followed by 1000, 1500, and 2000. After 2000 I will use a very fine buffing compound and it will be like glass. After wet sanding with 2000, you can just touch it with a power buffer and it will gloss immediately without any kind of compound.. I am doing two necks, the G&L and a Fender VI bass neck which will have a vintage tint. I am converting my John Mayer Strat to a Bass VI with a 30" scale. These projects are always fun. Thanks for posting Ken. -- Darwin
One suggestion though: try the tint on a scrap of hard maple before you put any on the neck. I haven't finished a guitar (yet), but I have learned from woodworking to test any penetrating finishes or tints on the same type of wood I am using for a project. I'm just thinking of the paint sticks I've used that were very soft, porous wood. You might get a bit less absorption into the bass neck, and end up with a lighter tint than you're expecting.
Excellent point which is easy to control. I will simply add an additional coat or two of stain depending on well it is absorbed by the maple. If i were to get too dark it can sanded a bit to lighten it up.
The final finishing is the fun part as it just gets wow when you hand buff it. I will apply about 10 coats of Tru Oil and then wet sand with 600, followed by 1000, 1500, and 2000. After 2000 I will use a very fine buffing compound and it will be like glass. After wet sanding with 2000, you can just touch it with a power buffer and it will gloss immediately without any kind of compound.. I am doing two necks, the G&L and a Fender VI bass neck which will have a vintage tint. I am converting my John Mayer Strat to a Bass VI with a 30" scale. These projects are always fun. Thanks for posting Ken. -- Darwin
Re: M 2500 Neck Project
Sun Feb 01, 2015 10:12 pm
Darwin,
Thanks for the info. I was planning to buff the scuffs out of the '83 SC-2 I've had in the Marketplace, but I went ahead and traded it to my local shop today instead of waiting for it to sell.
Ken
Thanks for the info. I was planning to buff the scuffs out of the '83 SC-2 I've had in the Marketplace, but I went ahead and traded it to my local shop today instead of waiting for it to sell.
Ken
Re: M 2500 Neck Project
Tue Feb 03, 2015 7:56 am
darwinohm wrote: I am converting my John Mayer Strat to a Bass VI with a 30" scale.
This sounds interesting,

Re: M 2500 Neck Project
Tue Feb 03, 2015 9:08 am
darwinohm wrote: I am converting my John Mayer Strat to a Bass VI with a 30" scale.
Elwood wrote: This sounds interesting,
There is a story behind all this Elwood. I purchased a brand new John Mayer Strat with a bowed neck cheap, less than a loaded body would cost. I had the neck steamed and it was fine. The question was how long would it stay straight. It did settle back a bit and the truss rod is tighter than I like but it plays great and the relief is about .008. I am going to take that neck in and have it worked on a bit and had thought about replacing the neck. Considering the numbers of electrics that I have I decided I would like to try either a baritone or bass VI. I probably would use a bass VI more than a baritone as I gig as a bass player.
Last fall a neck came up on CL that was unused. The neck is made by D C Kunkle who apparently has had some success in making these bolt on conversions. It is a fine neck with excellent fret work. I am in no hurry on this project but it is coming together. It is finished in thin nitro and I believe that I am going to strip it, fill the string tree and tuner mounting holes and start over with a vintage tint like the John Mayer has, and then my final gloss finish. I already have locking tuners to install, with no string trees, and it will take some time and setup. The nice part is I can completely revert to original if I wish.
I love these projects and they entertain me for a good bit of time. I even have a perfect case for it. By the way, the baritone scale is 27 in. so this will be a bit longer. This information is probably way more than you bargained for Elwood, but we have curious minds as I have witnessed from some of your cool projects.
 Probably boring to most but we dig it! -- Darwin
Re: M 2500 Neck Project
Tue Feb 03, 2015 9:19 am
darwinohm wrote: This information is probably way more than you bargained for Elwood, but we have curious minds as I have witnessed from some of your cool projects.
I was hoping for a detailed story...you delivered, thanks.
I have a couple long and low things in the works, one is a conversion of sorts, the other is from scratch.
Here's to things coming together

Re: M 2500 Neck Project
Tue Feb 03, 2015 10:30 am
Elwood wrote:
Don't be afraid to share these tidbits as thing progress. -- Darwin
I have a couple long and low things in the works, one is a conversion of sorts, the other is from scratch.
Don't be afraid to share these tidbits as thing progress. -- Darwin
Re: M 2500 Neck Project
Tue Feb 24, 2015 2:27 pm
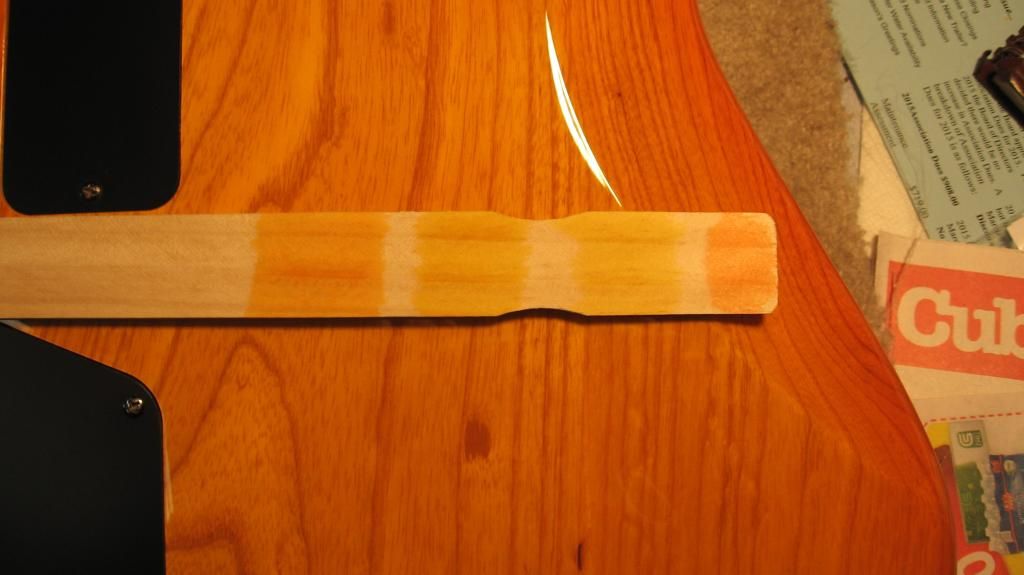
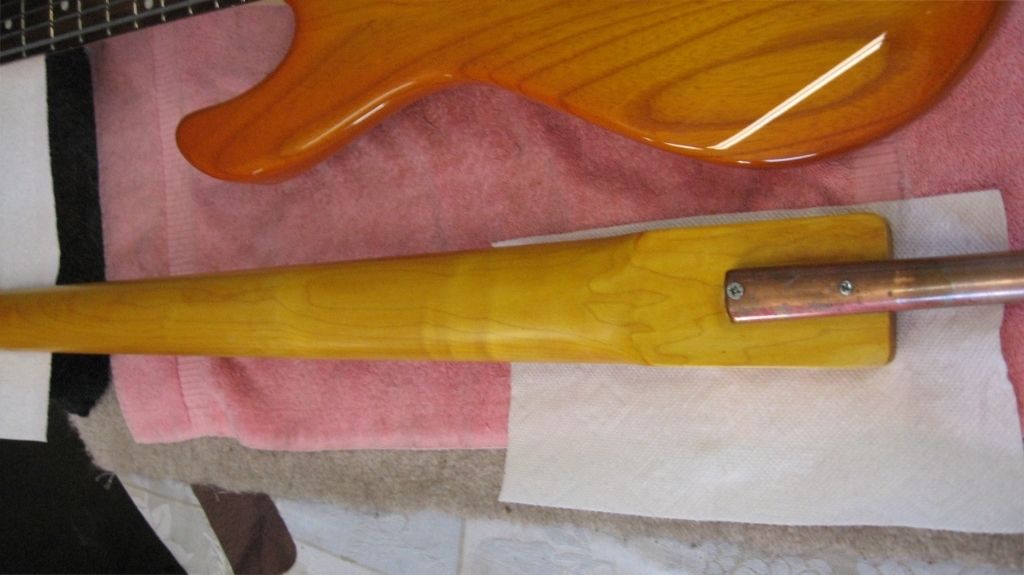
I am home alone for a week so I finally returned to the neck project. I was going for the old type GOT but I am trying to get about the same color as the middle of the Honeyburst on the bass. This is my first pass and I am close, in fact the top may be there. The back of the neck may need to be darkened up a bit. Keep in mind that the finish I will be applying has a slight vintage tint to it. I will mess with it tomorrow after the dye has dried. I may just be there. Let me know what you think about dyeing it a bit darker. -- Darwin.


Re: M 2500 Neck Project
Wed Feb 25, 2015 6:18 am
looks fantastic Darwin.
Back might need a bit darker, but its hard to mess with a good thing, looks great as is!
Back might need a bit darker, but its hard to mess with a good thing, looks great as is!
Re: M 2500 Neck Project
Wed Feb 25, 2015 9:18 am
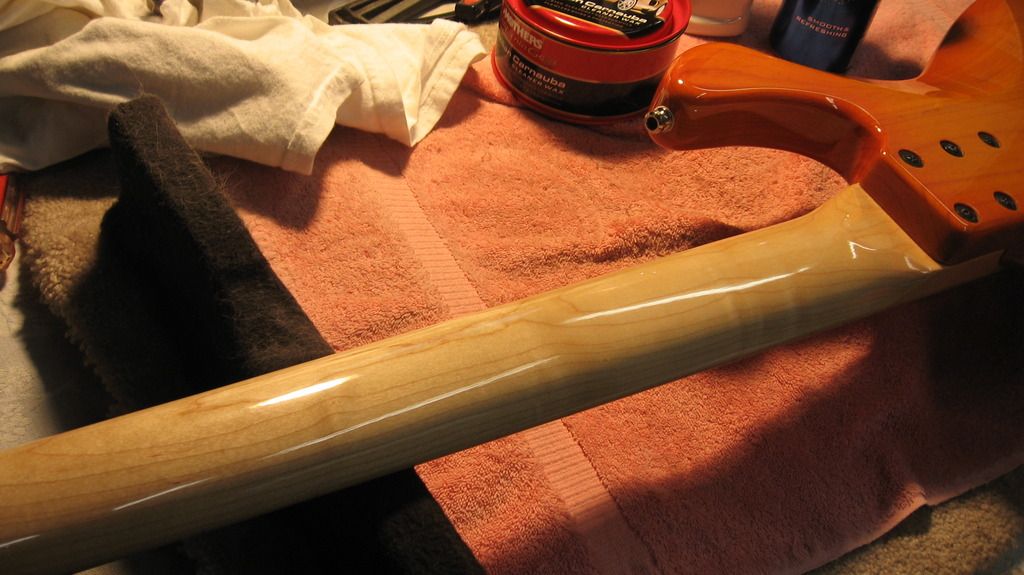
Thanks Alf, I did add another coat of dye to the back of the neck last evening and this it what I think it should be. I will now start doing the topcoats and that will take about 10 days. I will use at least 10 coats and then wet sanding and buffing. Here are new photos of the neck back.

I was interested in dying the wood to get the absorption of the grain rather than just putting the dye in the topcoat finish. That would have given the perfect tint that G&L uses today. I happen to prefer the old GOT look.
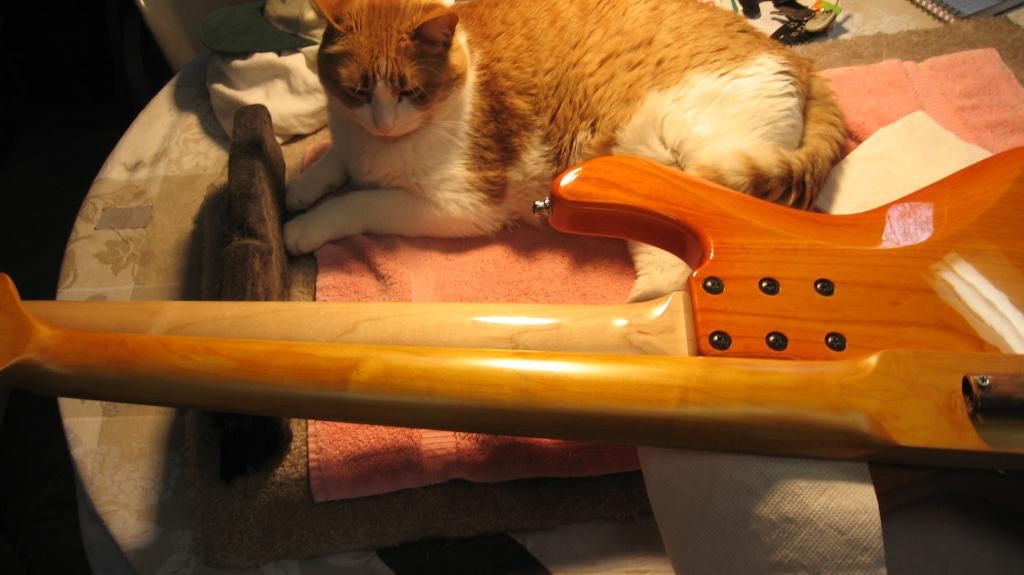
The difficult part is done and it is now home free, just some time. These is a fun project for me as I have not done staining with dye before. Believe me, anyone can do this if you have a bit of patience! As you can see, Sam, my inspector, is keeping tabs on things!-- Darwin


I was interested in dying the wood to get the absorption of the grain rather than just putting the dye in the topcoat finish. That would have given the perfect tint that G&L uses today. I happen to prefer the old GOT look.
The difficult part is done and it is now home free, just some time. These is a fun project for me as I have not done staining with dye before. Believe me, anyone can do this if you have a bit of patience! As you can see, Sam, my inspector, is keeping tabs on things!-- Darwin
Re: M 2500 Neck Project
Wed Feb 25, 2015 10:48 am
Looking good !! That must be satisfying .
I've yet to play with dyes, nice to hear the learning curve isn't way steep ; )
elwood
I've yet to play with dyes, nice to hear the learning curve isn't way steep ; )
elwood
Re: M 2500 Neck Project
Thu Feb 26, 2015 5:48 am
loving it now!!! Its going to be awesome!
Re: M 2500 Neck Project
Thu Feb 26, 2015 8:45 am
Thanks Alf and Elwood. There are always unknowns when using new products. I was concerned that the dye could be dissolved by the first coat of Tru Oil as it is rubbed on with a cloth. I applied the first coat this morning and the dye was perfectly stable. I am home free now and will continue with two coats per day. This is really getting fun. -- Darwin
Re: M 2500 Neck Project
Mon Mar 02, 2015 4:27 pm
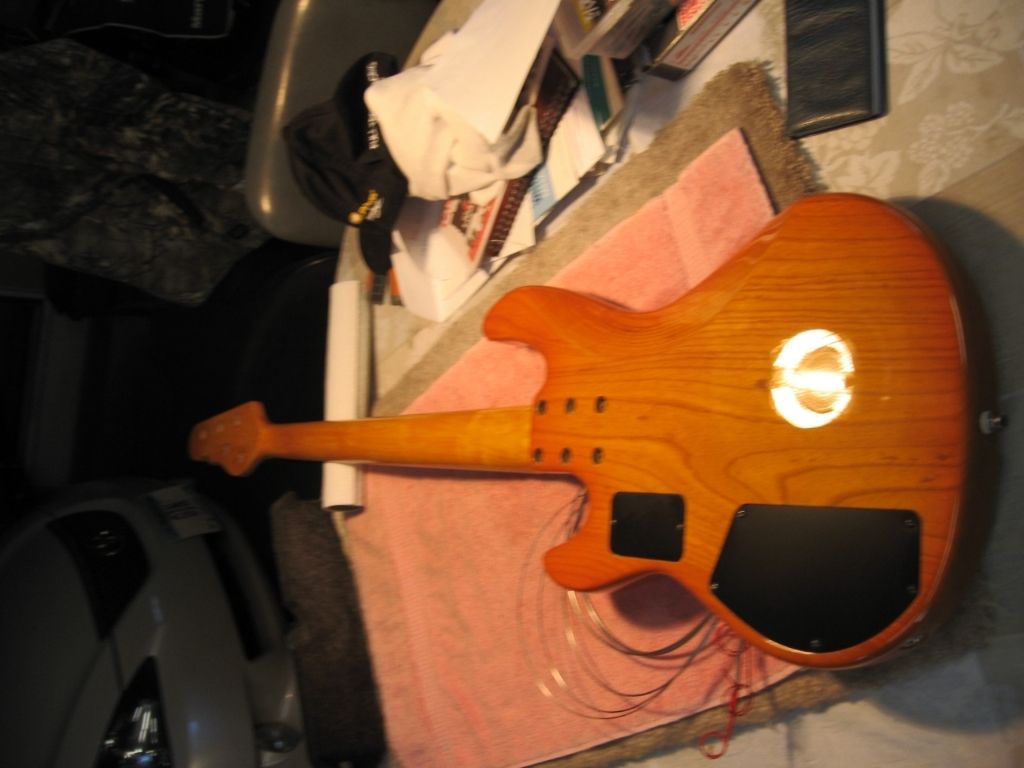
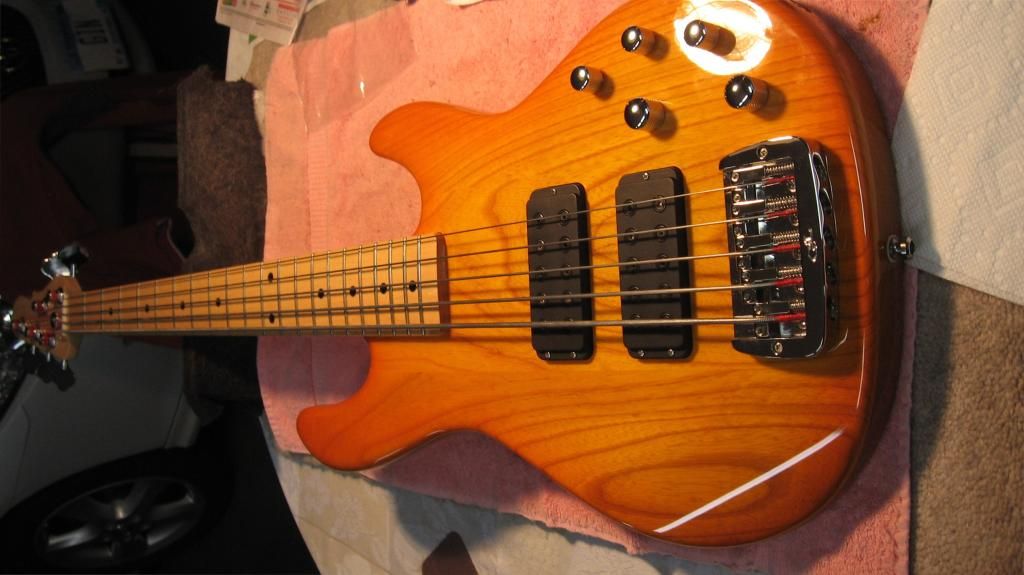
The transformation has begun. I have 12 topcoats completed and here is an update to show the colors. The neck will be wet sanded and buffed in about a week. Here are a couple of photos showing the body and neck pocket with shim.
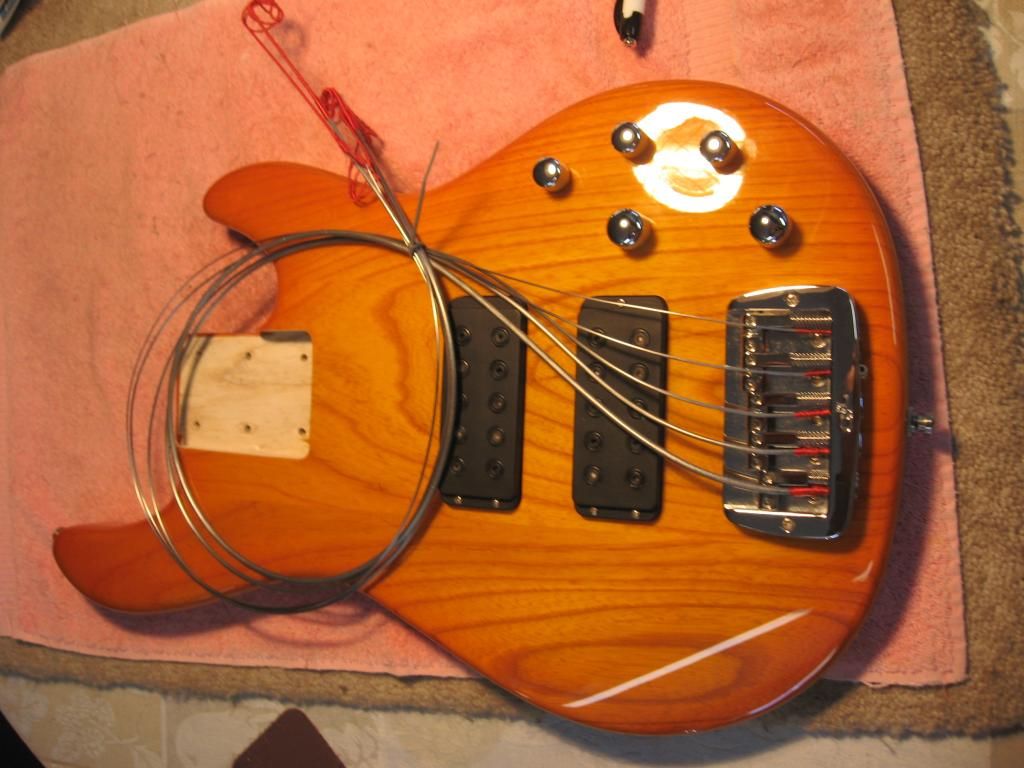
Here are front and back with the new neck fitting loosely. The neck pocket fits perfectly.
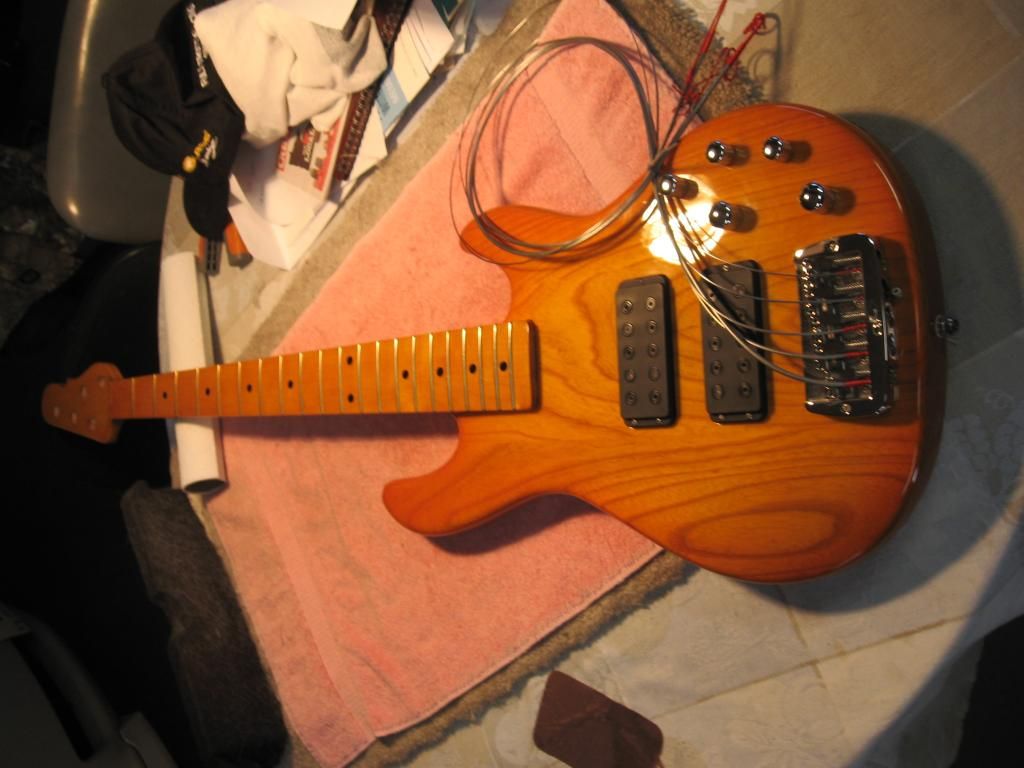
II will be drilling holes in the next few days for the tuners and neck screws. I will mount the hardware and install the nut after buffing. Then attach the neck and do a complete setup. It will then be ready to gig. -- Darwin


Here are front and back with the new neck fitting loosely. The neck pocket fits perfectly.


II will be drilling holes in the next few days for the tuners and neck screws. I will mount the hardware and install the nut after buffing. Then attach the neck and do a complete setup. It will then be ready to gig. -- Darwin
Re: M 2500 Neck Project
Sun Mar 08, 2015 1:46 pm
I am watching your progress on this project with great interest, Darwin.
I bought 3 maple necks from the G&L online store to replace problem necks on some of my older G&Ls.
I have used a 4 string neck on an older L-2000 and it is very nice and they fit a 3 bolt neck pocket perfectly. I didn't bother to put any finish on it because I was eager to play that bass again.
I also have a maple 5 string neck, just like yours, to use on my L-2500.
Your finishing technique is very educational. I like the tint you are getting. The neck looks great.
Re: M 2500 Neck Project
Sun Mar 08, 2015 2:47 pm
That neck turned out great Darwin! I too am partial to the old GOT necks; I have one on my ASAT Classic and it really looks good with the black body. Thanks for posting this very educational thread. - Greg.
Re: M 2500 Neck Project
Sun Mar 08, 2015 4:12 pm
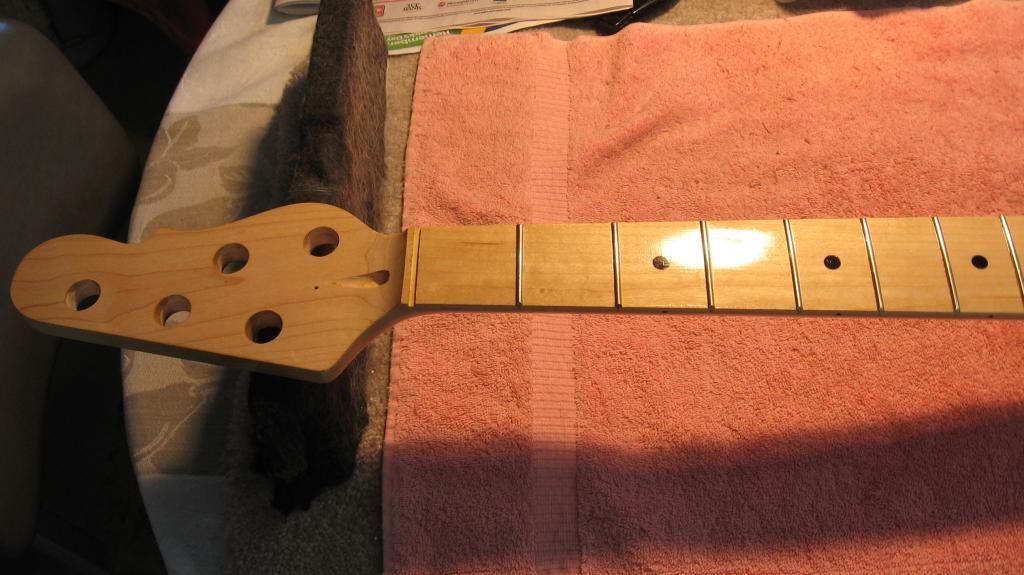
Case and Bassman. Interesting that you ask as a lot has happened. I was home free until I started wet sanding. The waterbased stain had not bonded to the body so it flaked quite easily. I am not into relics so I stripped everything off. In the mean time I has disassembled the M2500 and decided that I didn't have time for any more experimenting with this neck. This is my main gigger and it needs to be in action in a little over a week.
Here is why these projects are fun, either success or failure is a great learning experience. I did discover that the G&L replacement neck was either sealed or I believe it was finished. It was hard to tell as I had not stained a maple neck before. I decided that this neck has a very nice grain and I would be happy with with a gloss clear. It turns out that this was a good decision. Remember that I have a bass VI neck I am also doing. I am in no hurry on that one so it gets the staining experiment. More on that later.
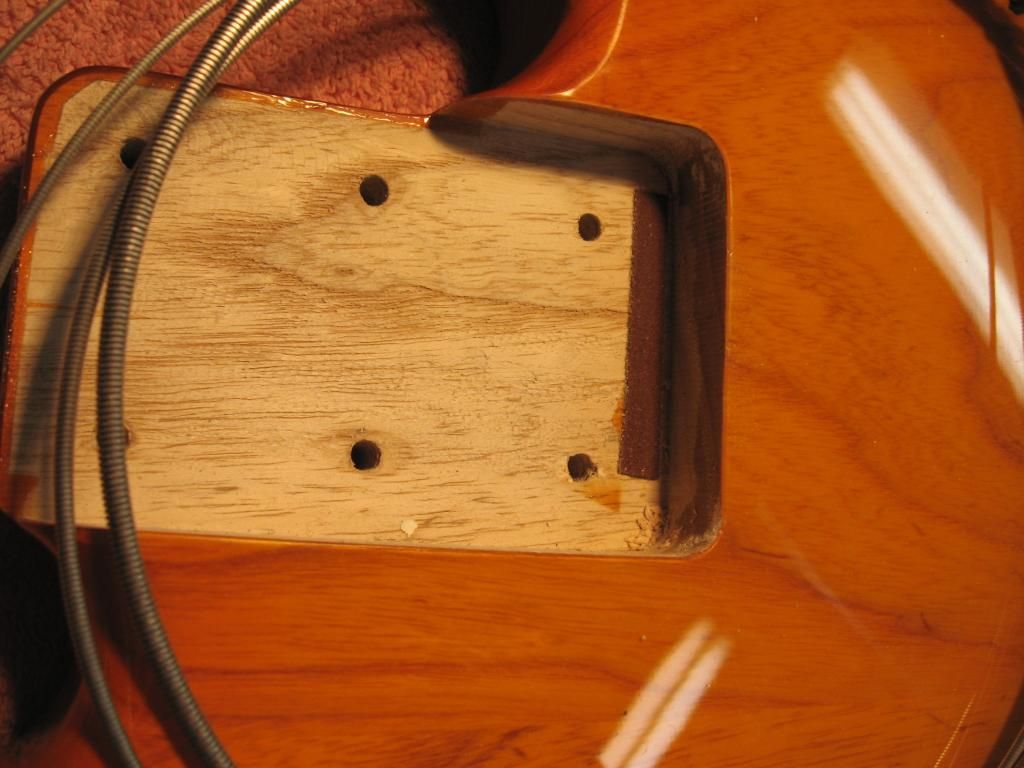
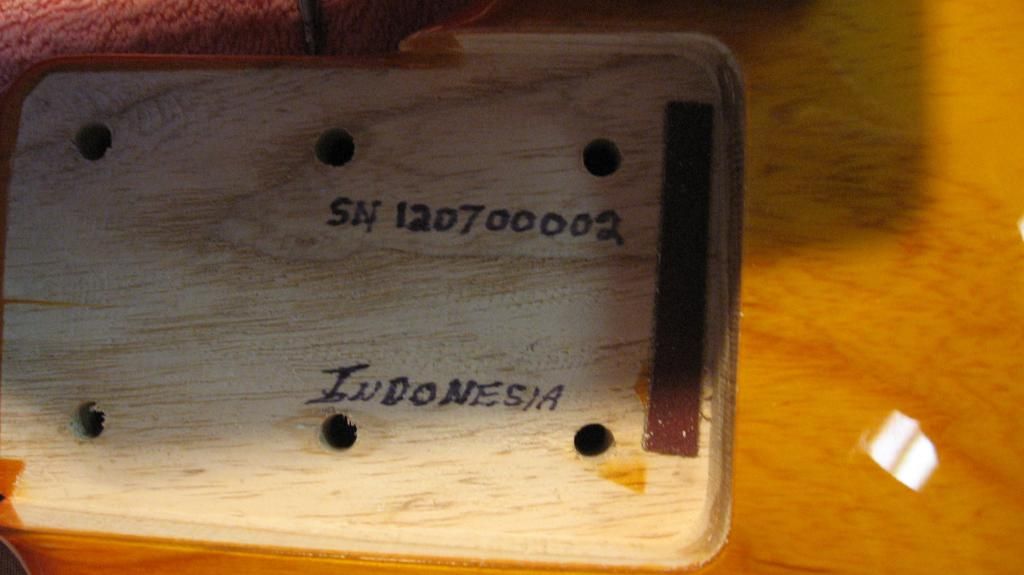
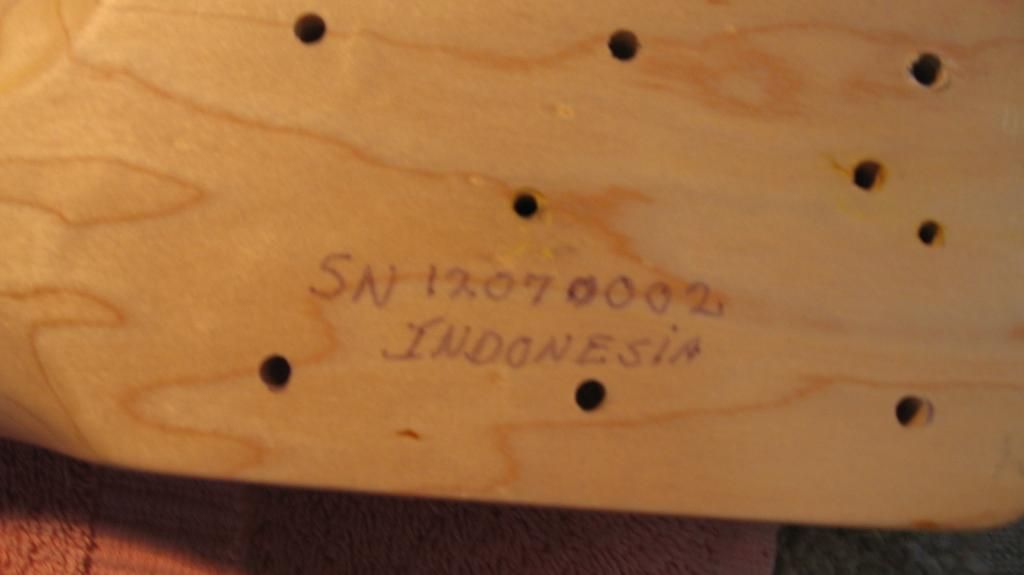
I had to ream the tuner holes quite a bit to fit the ferrules. I drilled all the holes and fit the neck to the body. Everything fits well and the neck mounting holes are drilled. I was surprised to find that the body holes were the same size as the neck holes and would not make for a very tight neck/body coupling. Bad on G&L. I drilled the holes in the body so the screws slip though and now all is good. I have now refinished the neck and it will be wet sanded in about a week. I wrote the serial number and country of origin in both the neck pocket and base of the neck. It will also be recorded in the registry when it is completed. I am extremely happy with the results so far.
Now on to the Bass VI neck which will be going on my John Mayer Strat. This is a 30 inch scale and the neck is a DC Kunkle neck who has done many baritone and Bass VI necks. I decided to go Bass VI as I found a like new neck on CL. I wanted to do a nice vintage dye on this on. I have discovered the dye which is water based has to be mixed in the Casey Tru Oil or Poly if that is your medium. It did mix perfectly with the Tru Oil and I now have several coats applied and am going to do a couple of more coats in just clear. I used a vintage Amber dye and I like it. I used Honeyburst Amber on the G&L neck initially and the color was sweet but Sh** can happen and it did! These setbacks Don't slow me down a lot, just enough time to think through it. I will be taking more time on the Bass VI and am in no hurry. The G&L will be buffed out in a week and road ready. Here are photos of the Bass VI neck. This one with have Fender locking tuners on it.
If anyone is going to do this, pm me and I will share what did and did not work for me. Fun and games!!!!-- Darwin
Here is why these projects are fun, either success or failure is a great learning experience. I did discover that the G&L replacement neck was either sealed or I believe it was finished. It was hard to tell as I had not stained a maple neck before. I decided that this neck has a very nice grain and I would be happy with with a gloss clear. It turns out that this was a good decision. Remember that I have a bass VI neck I am also doing. I am in no hurry on that one so it gets the staining experiment. More on that later.
I had to ream the tuner holes quite a bit to fit the ferrules. I drilled all the holes and fit the neck to the body. Everything fits well and the neck mounting holes are drilled. I was surprised to find that the body holes were the same size as the neck holes and would not make for a very tight neck/body coupling. Bad on G&L. I drilled the holes in the body so the screws slip though and now all is good. I have now refinished the neck and it will be wet sanded in about a week. I wrote the serial number and country of origin in both the neck pocket and base of the neck. It will also be recorded in the registry when it is completed. I am extremely happy with the results so far.


Now on to the Bass VI neck which will be going on my John Mayer Strat. This is a 30 inch scale and the neck is a DC Kunkle neck who has done many baritone and Bass VI necks. I decided to go Bass VI as I found a like new neck on CL. I wanted to do a nice vintage dye on this on. I have discovered the dye which is water based has to be mixed in the Casey Tru Oil or Poly if that is your medium. It did mix perfectly with the Tru Oil and I now have several coats applied and am going to do a couple of more coats in just clear. I used a vintage Amber dye and I like it. I used Honeyburst Amber on the G&L neck initially and the color was sweet but Sh** can happen and it did! These setbacks Don't slow me down a lot, just enough time to think through it. I will be taking more time on the Bass VI and am in no hurry. The G&L will be buffed out in a week and road ready. Here are photos of the Bass VI neck. This one with have Fender locking tuners on it.


If anyone is going to do this, pm me and I will share what did and did not work for me. Fun and games!!!!-- Darwin
Re: M 2500 Neck Project
Mon Mar 09, 2015 6:21 pm
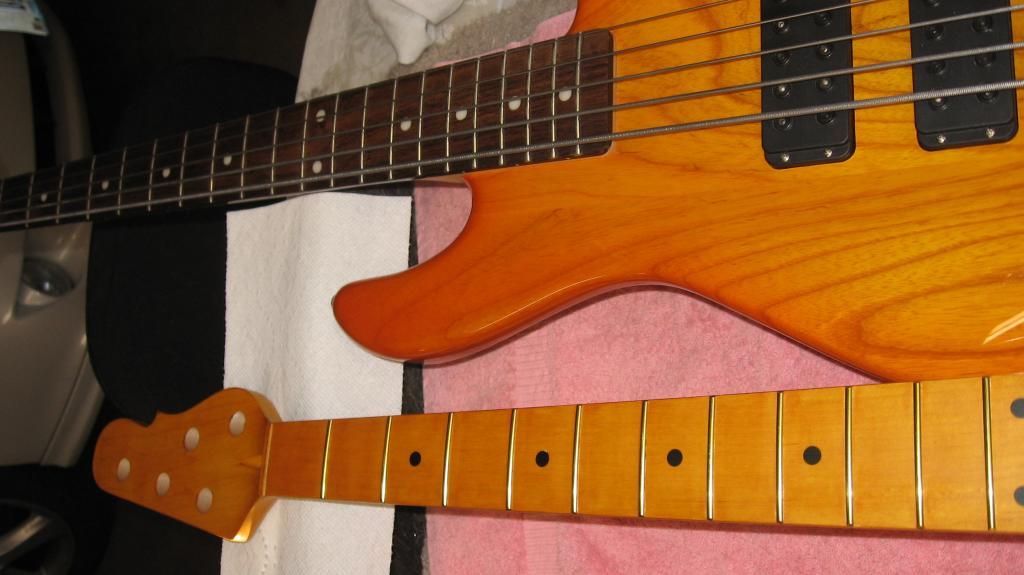
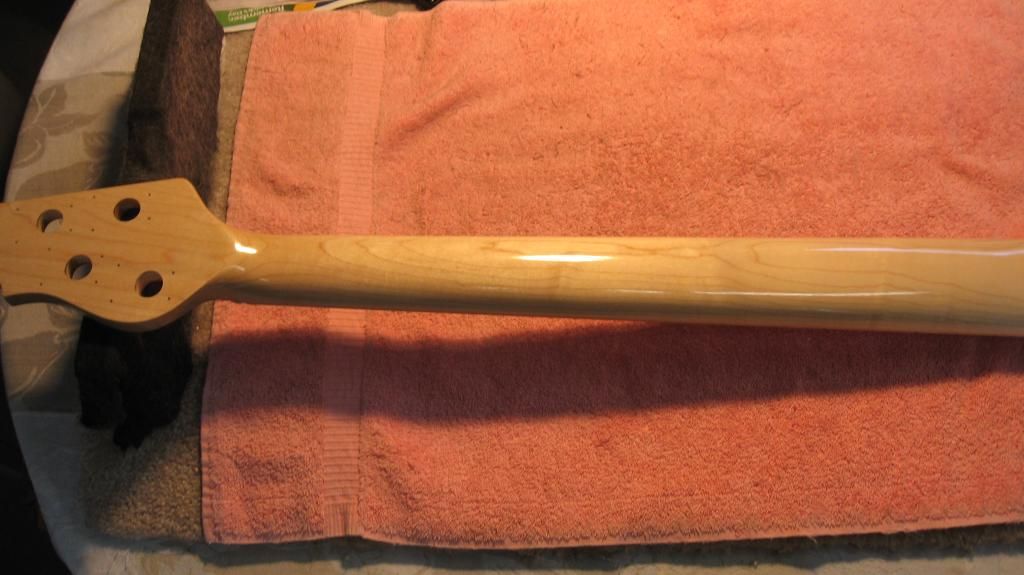
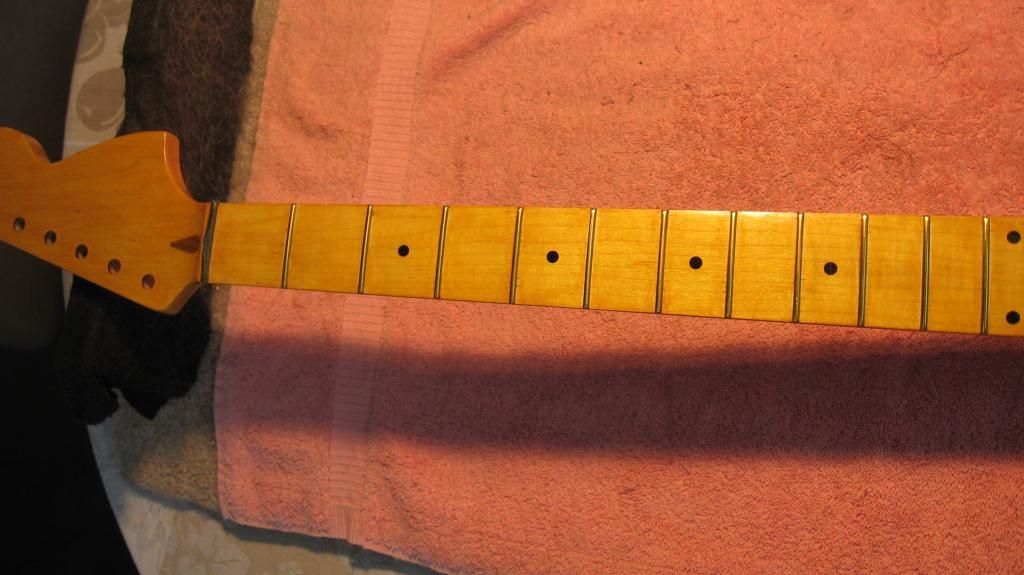
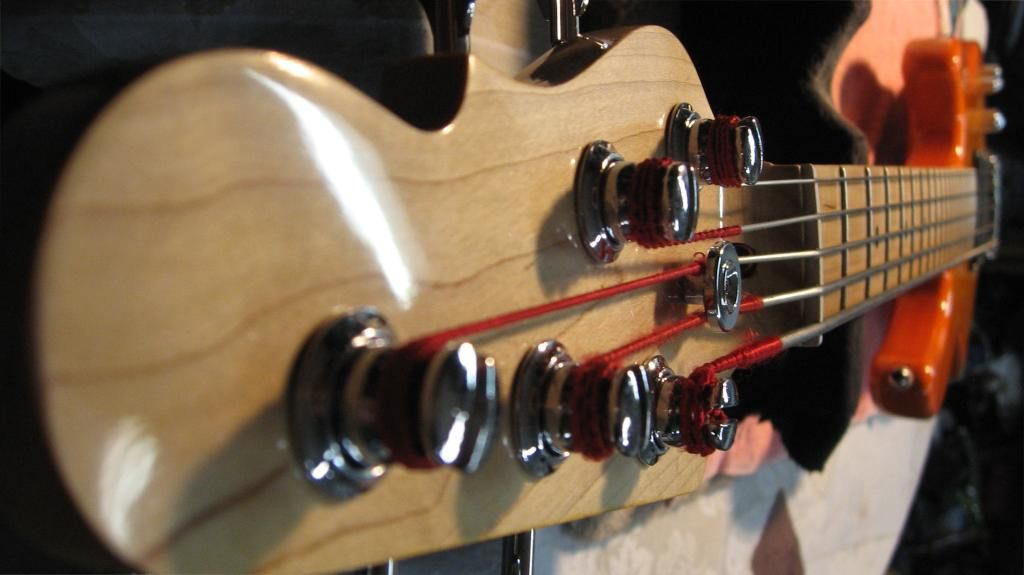
I decided to reassemble everything today. I presses the tuner ferules in and installed the tuners and the string tree. I then installed the neck on the body and strung it up with the nut loose. After the string alignment and nut adjusting I did a complete setup and did this baby dial in. It is gig ready. It already has a great gloss but I will back the strings off in about a week and do a final wet sand and buff on the fretboard and back of the neck. Project completed and now I will get to the Bass VI neck as soon as my bottle of Tru Oil arrives. The registry has been updated with the new info and here are the pics from today. -- Darwin


Re: M 2500 Neck Project
Mon Mar 09, 2015 6:58 pm
beautiful work Darwin !! ....... is there a weight difference between the maple neck and the rosewood ??
Re: M 2500 Neck Project
Mon Mar 09, 2015 7:00 pm
I agree with Eric...great job Darwin! 
Re: M 2500 Neck Project
Tue Mar 10, 2015 6:34 am
Thanks guys. Eric, I did weigh it and I think it may have picked up about an Oz. It is not noticeable. I have always preferred maple as I can see it better in low light.
I wish I could order a set of tuners and a nut from the G&L store but they are not listed. I would like to make this rosewood neck into a fretless neck and the necks could be swapped out in minutes. -- Darwin
I wish I could order a set of tuners and a nut from the G&L store but they are not listed. I would like to make this rosewood neck into a fretless neck and the necks could be swapped out in minutes. -- Darwin
Re: M 2500 Neck Project
Wed Mar 18, 2015 7:02 am
The five string neck looks great, Darwin. I know that the Tribute necks that are sold from the G&L online store are finished with a satin finish.
I used one four string neck on my '82 L-2000 right out of the box. I used a nut from another bass neck and bolted on some Schaller mini tuners and it works great on that bass.
I figured that any stain added to those necks would sit on top of the finish so the stain and finish coats have to be compatible with the satin urethane used at the Indonesian factory. I would guess that it is difficult to try and get that right on the first try.
I like the gloss neck and I can see why you just used the neck w/o any stain.
Good job on the M-2500.
Re: M 2500 Neck Project
Wed Mar 18, 2015 7:57 am
Bassman, The neck is now buffed, I couldn't be happier and thanks for the comments. These necks from the G&L store are an incredible deal. I wish I had purchase an Asat Maple neck before they ran out. The solution for tinting the neck is to put the dye into the top finish. That is what I have done on the Bass VI neck and it did the job. You have also done a lot of these projects and they sure are fun! The bass goes into action Friday and Saturday nights. -- Darwin
Re: M 2500 Neck Project
Sun Mar 22, 2015 11:00 am
I had closed the chapter on this project however, there seems to be a final chapter.
Lets look at the change that was made. A rosewood fretboard maple neck was replaced with a maple fretboard maple neck. Lets consider that when fretting the string the fretboard surface should have minimal to no impact on the tone. The neck wood itself, maybe, but you will have a hard time convincing me that the fretboard surface material will have much effect. The neck wood, yes but were just talking the fingerboard.
We gigged at a regular monthly place this weekend so we are very familiar with the acoustics of the place. I also rarely change settings on my amp and do any tone settings on the guitar. We started the gig Friday night and I had the controls on the guitar as I always have. I was doing some higher register licks and was shocked. They were noticeably louder than normal and it actually threw me off for a bit. Wow! What is going on here?? Then I started to really listen to what was happening with this M-2500. The higher notes on the highest strings noticeably more pronounced that they were before. Now I know some of you are going to say "maple". It makes a guitar brighter. That may be true but to a point but not like this. The tone was beautiful. I finally raised the bass frequency control to balance it a bit more and we were in heaven. This bass has always been my favorite but what a nice surprise.
So here's the deal and in retrospect it really makes sense to me. Again this is a Tribute M-2500 and early in this post I mentioned that when fitting the neck I discovered that the neck holes in the body were the same as the holes in the neck. The screws were just as tight going through the body as going into the neck. This is not going to make a perfectly tight coupling between the body and neck. Even if it were clamped together it would not be as tight as being able to draw the neck to the body with the screws. I did drill the holes in the body larger so the screws slip through. It really has a nice fitting heel.
If I were to have had someone do this job I would have thought the neck was the difference. I think the neck coupling is much better and that is the difference. Quite frankly l didn't expect any difference and was a bit shocked.
If you own a Tribute Bass I would check one bolt in the neck by removing it and see if it slips through the body hole. If it doesn't, I would remove the neck, enlarge the body holes and reassemble. I really love the feel of this neck as I did the fret work on the edges before finishing and it really has a nice feel.
So the discussion begins. -- Darwin
Lets look at the change that was made. A rosewood fretboard maple neck was replaced with a maple fretboard maple neck. Lets consider that when fretting the string the fretboard surface should have minimal to no impact on the tone. The neck wood itself, maybe, but you will have a hard time convincing me that the fretboard surface material will have much effect. The neck wood, yes but were just talking the fingerboard.
We gigged at a regular monthly place this weekend so we are very familiar with the acoustics of the place. I also rarely change settings on my amp and do any tone settings on the guitar. We started the gig Friday night and I had the controls on the guitar as I always have. I was doing some higher register licks and was shocked. They were noticeably louder than normal and it actually threw me off for a bit. Wow! What is going on here?? Then I started to really listen to what was happening with this M-2500. The higher notes on the highest strings noticeably more pronounced that they were before. Now I know some of you are going to say "maple". It makes a guitar brighter. That may be true but to a point but not like this. The tone was beautiful. I finally raised the bass frequency control to balance it a bit more and we were in heaven. This bass has always been my favorite but what a nice surprise.
So here's the deal and in retrospect it really makes sense to me. Again this is a Tribute M-2500 and early in this post I mentioned that when fitting the neck I discovered that the neck holes in the body were the same as the holes in the neck. The screws were just as tight going through the body as going into the neck. This is not going to make a perfectly tight coupling between the body and neck. Even if it were clamped together it would not be as tight as being able to draw the neck to the body with the screws. I did drill the holes in the body larger so the screws slip through. It really has a nice fitting heel.
If I were to have had someone do this job I would have thought the neck was the difference. I think the neck coupling is much better and that is the difference. Quite frankly l didn't expect any difference and was a bit shocked.
If you own a Tribute Bass I would check one bolt in the neck by removing it and see if it slips through the body hole. If it doesn't, I would remove the neck, enlarge the body holes and reassemble. I really love the feel of this neck as I did the fret work on the edges before finishing and it really has a nice feel.
So the discussion begins.
-- Darwin
Re: M 2500 Neck Project
Mon Mar 23, 2015 4:56 pm
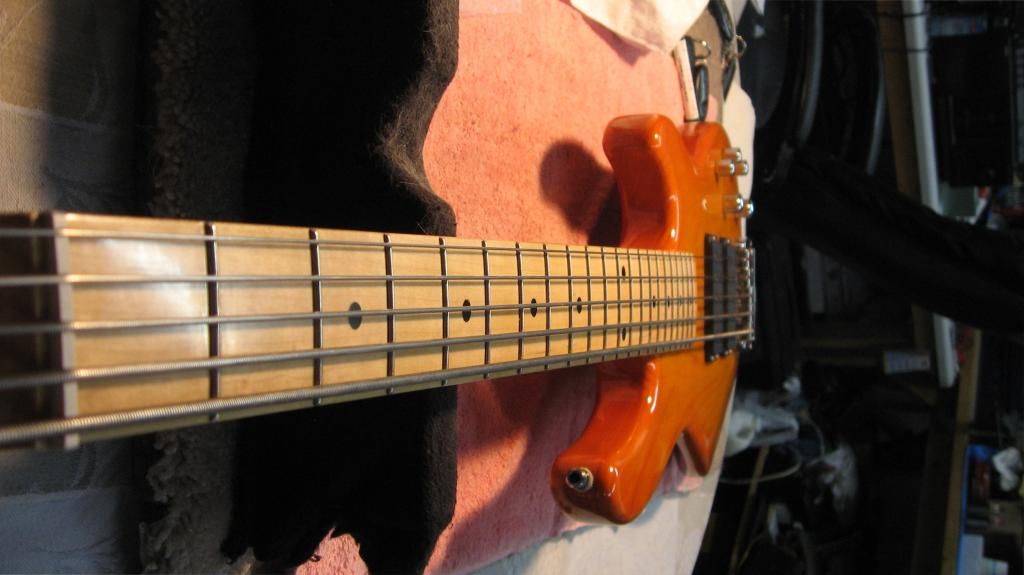
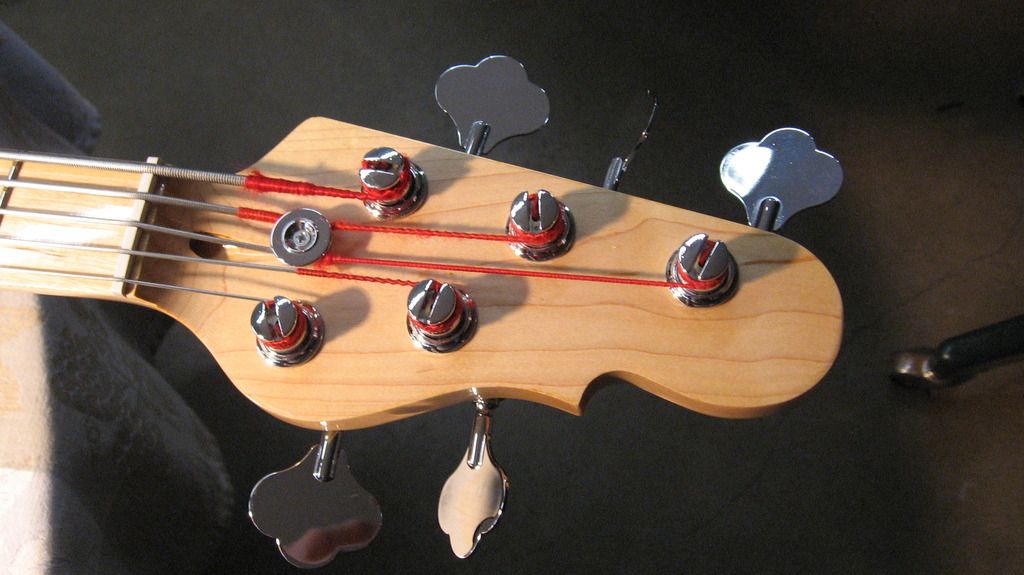
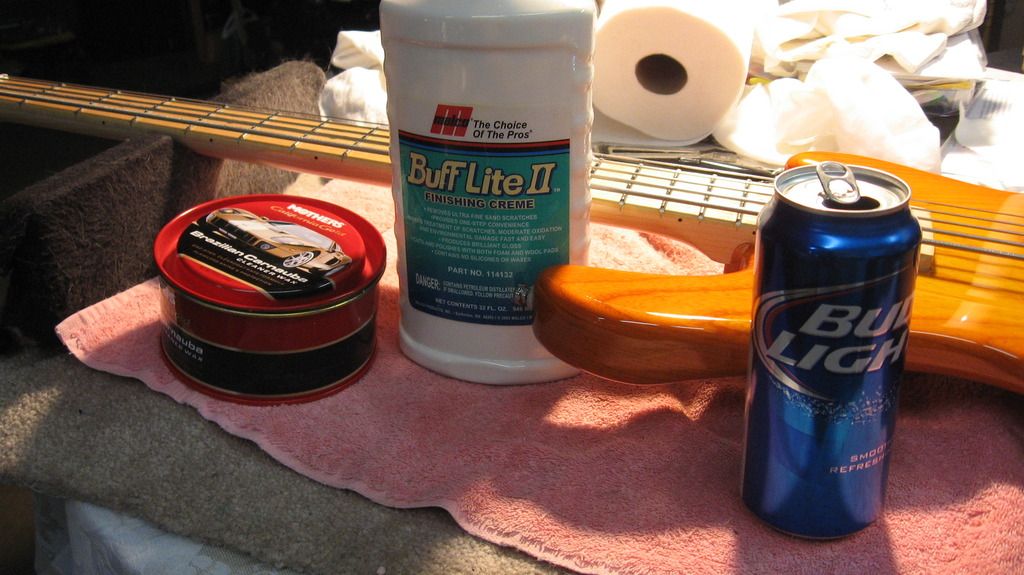
Today was the final buff. Here are some photos. This project is done!!!!!!
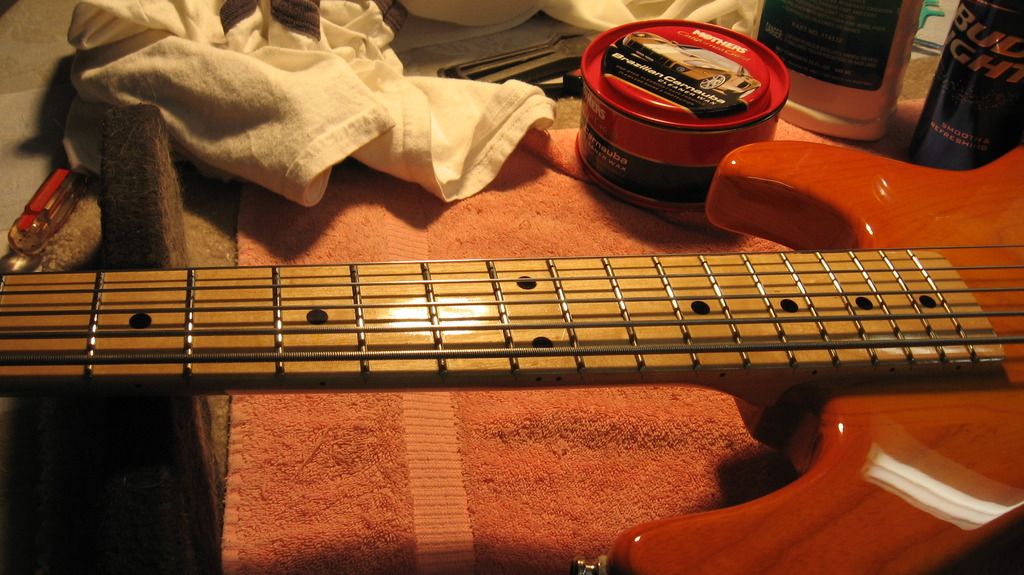
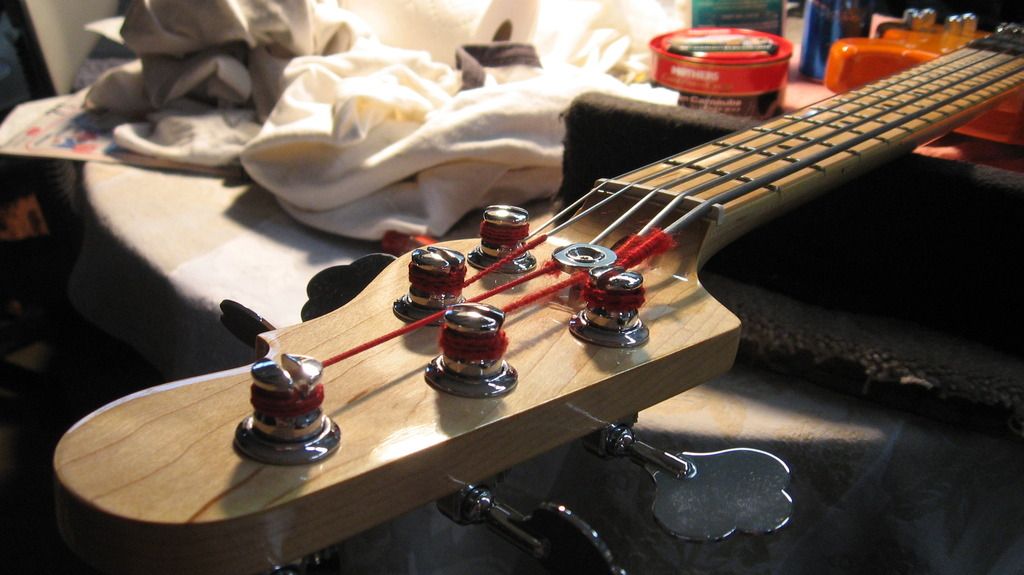
Something about a naked headstock!
And the products used for the final power buff.
Now back to the Bass VI. -- Darwin


Something about a naked headstock!

And the products used for the final power buff.

Now back to the Bass VI. -- Darwin
Re: M 2500 Neck Project
Mon Mar 23, 2015 6:51 pm
Beautiful job Darwin!!
I think you deserve a cold one! Cheers!
- Jos
I think you deserve a cold one! Cheers!
- Jos
Re: M 2500 Neck Project
Tue Mar 24, 2015 4:38 am
I didn't know a Bud Light could get a result like that! 
Re: M 2500 Neck Project
Tue Mar 24, 2015 2:41 pm
Thanks Case and Jos. Bud light can really give a shine! -- Darwin