Homemade Cabinet - No. 2
Tue Nov 30, 2010 5:19 am
Last week Dave P asked what projects we have on. It gave me the well needed kick up the bum to get around to finishing off a speaker cabinet I'd started. And here it is on the right, next to my 'Paisley Deluxe' 5E3 clone.

It's made from solid pine. I used plain ol' butt joints to make it - no fancy finger joints or dovetails. It's very solid as I not only used long screw to hold the joints together but have braced it internally with 32x32mm in each corner from the front to the back of the cab which I screwed each of the panels to in four places. I can put all 230lbs of me on it and there is no sign of movement/buckling. The paisley is some cheap fabric I bought when I covered the amp. I used fabric because tolex is so damn expensive and is hardly an impenetrable barrier - it tears off and dents just as easy as fabric. It's lacquered using white polish, which I believe is some sort of shellac. I ran out of the lacquer I was using so it doesn't have quite the same sheen as its bigger brother (its expensive stuff so I'm not going to buy any more of it), but there's only one coat difference. Next time I'll use polyurethane as it's a quarter of the price, would provide better protection and probably looks identical - we live and learn from our mistakes! All I have to do now is put a handle on it. I might put the piping on it but I'd have to take the grille off, the speaker out, plane the edges of the baffle back and then put it together again.......I wish I'd remembered it first time around
It has an Eminence 'Rajin Cajun' 10" speaker in it. I'd only ever heard the speaker without a cabinet and thought it was rubbish, but I had it and figured it'd be better off in a cabinet than the box it came in. My opinion of the speaker changed drastically today - it sounds amazing! It responds very nicely across all frequencies. The treble is not at all harsh or shrill. There are less mids than in the Eminence than I'm used to hearing in this amp (it has a Weber 12A125A AlNiCo mag vintage type thing in it). The bass is tight, focused and well rounded, just like it should be. It's also considerably louder than the Weber, yet it still sounds like a vintage type amp. Brilliant!!! I thought I preferred 12" speakers but hearing this thing has really made me question my preference.
This little cab - and it is little at just under a cubic foot - is going to become a regular part of my gig rig. I constantly have trouble hearing the finer points of my playing on stage, particularly during solos, which causes me to pick much harder than usual, which ultimately leads to me playing badly. This little guy is going to be pointed square at my face all night, effectively becoming my 'guitar only' monitor.
This week I'll be putting together a cabinet for my Weber Neo15, which I bought for a third of what it's worth on whim. I'm very much looking forward to hearing this one in a cabinet, I've never played through a 15" speaker before. The plan is for something even more exotic than paisley for this one. Such a big, in-your-face speaker needs a cabinet to match!!!
If anyone else has a homemade cabinet, put a pic up here. I'd like to see what sort of things people are making!
Re: Homemade Cabinet - No. 2
Tue Nov 30, 2010 8:45 am
Cool looking Jamie  And paisley seems to be the fashion given that Paul Reed Smith uses similar covering for their top-of-the-line amps.
- Jos
And paisley seems to be the fashion given that Paul Reed Smith uses similar covering for their top-of-the-line amps.- Jos
Re: Homemade Cabinet - No. 2
Tue Nov 30, 2010 11:25 am
Very cool! The paisley definitely gives it a custom look! 
I've built a few cabs over the years. My first was a 1x12, which I used cheap plywood for, used mitre joints and braced it similarly to what you did. I used a dado joint in the baffle, which adds a lot of strength to the cab.
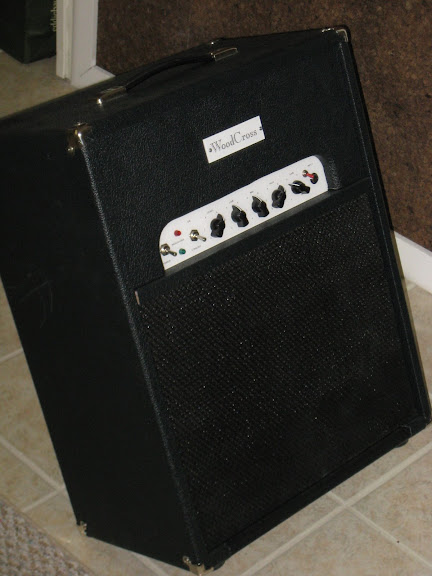
Below are pics of the 2x12 I use with my Marshall and also a 1x12 combo cab I built for my homebrew amp.
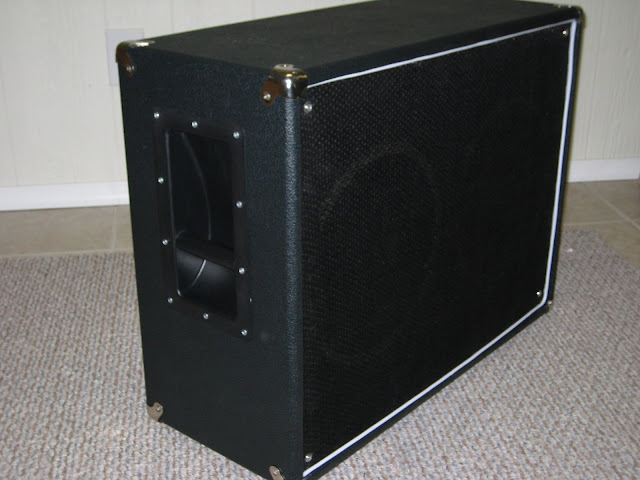
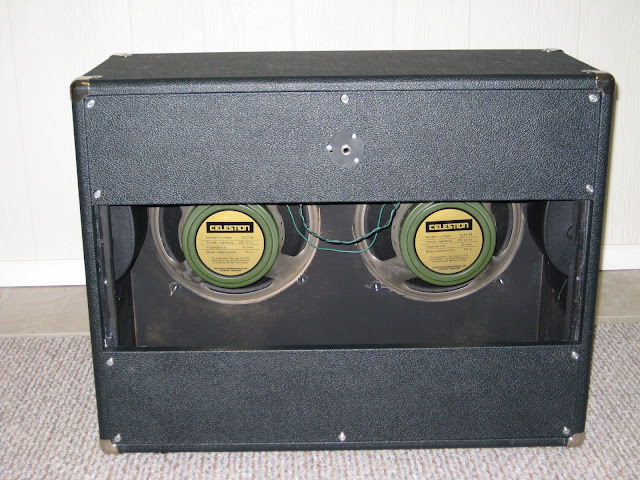
The 2x12 is built from 11-ply birch ply. I used dovetail joints for this one and a dado joint for the baffle. The back pieces are held on by cleats. It was uncovered for a few years...finally decided to tolex it a couple years ago (I don't really enjoy the tolexing part! But it I like the way they look when it's done). This one has G12M greenbacks in it.
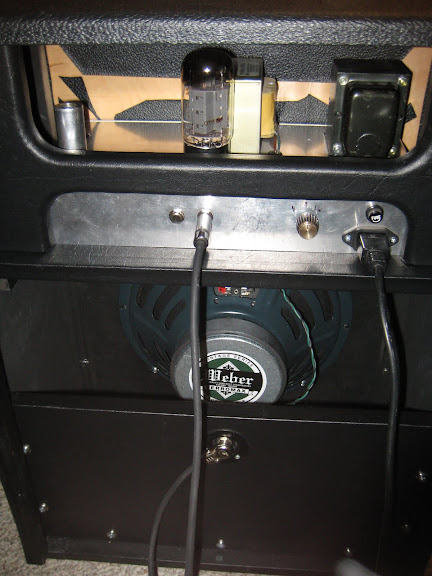
The 1x12 combo is also built from 11-ply birch ply, but I used rabbet and dado joints for this one. On this one the baffle is just held in by cleats, as are the front and back pieces. This amp has a black face preamp and is loaded with a Weber 12F150
I've built a few cabs over the years. My first was a 1x12, which I used cheap plywood for, used mitre joints and braced it similarly to what you did. I used a dado joint in the baffle, which adds a lot of strength to the cab.
Below are pics of the 2x12 I use with my Marshall and also a 1x12 combo cab I built for my homebrew amp.
The 2x12 is built from 11-ply birch ply. I used dovetail joints for this one and a dado joint for the baffle. The back pieces are held on by cleats. It was uncovered for a few years...finally decided to tolex it a couple years ago (I don't really enjoy the tolexing part! But it I like the way they look when it's done). This one has G12M greenbacks in it.
The 1x12 combo is also built from 11-ply birch ply, but I used rabbet and dado joints for this one. On this one the baffle is just held in by cleats, as are the front and back pieces. This amp has a black face preamp and is loaded with a Weber 12F150
Re: Homemade Cabinet - No. 2
Tue Nov 30, 2010 1:17 pm
Thanks for the comments guys 
Those are very nice looking cabs Muleya. I wish I had the wood working skills to cut dovetail joints. I'll have to practice and maybe one day I'll have the skills to do an entire cab without the bits breaking off. I love Celestion Greenbacks, they are PERFECT for guitar. I've seen a lot of praise for the 12F150 as a blackface speaker.
I had no idea that PRS made amps, especially in Paisley. I can't believe he stole my idea
Those are very nice looking cabs Muleya. I wish I had the wood working skills to cut dovetail joints. I'll have to practice and maybe one day I'll have the skills to do an entire cab without the bits breaking off. I love Celestion Greenbacks, they are PERFECT for guitar. I've seen a lot of praise for the 12F150 as a blackface speaker.
yowhatsshakin wrote:Cool looking Jamie
- Jos
I had no idea that PRS made amps, especially in Paisley. I can't believe he stole my idea
Re: Homemade Cabinet - No. 2
Tue Nov 30, 2010 3:09 pm
I don't have extensive experience in woodworking, and certainly didn't have much when I did those dovetails. I have access to a friend of the family's woodshop who's got nearly everything, and I found his dovetail jig and router and just decided to try it. It really wasn't all that hard...the hardest part is making sure you start from the right side of each piece! I first used that for a head cab, then built a second for a friend, so I had a couple under my belt when I built the 2x12 cab.
Then I saw one cab builder using the rabbet and dado joints, so decided to give that a try. I found it to be easier and would probably do that again. They are really strong joints.
Though I'm not sure I'm going to build anymore. While I kind of enjoy it, I can actually buy a cab from Avatar for nearly what I paid in materials for these cabs!! The tolex, tolex glue, grill cloth and hardware was over $100, then you've got the wood!!
Re: Homemade Cabinet - No. 2
Tue Nov 30, 2010 3:28 pm
I'm stunned at how inexpensive those Avatar cabs are. They're not cheap here, purely because of shipping, but if I were in the US I'd most likely have a few of them. Tolex is too expensive if you're just buying enough for one cab. I used fabric for that reason, its a quarter of the price. I contacted a manufacturer of the actual vinyl tolex, posing as a builder of amplifiers and its much cheaper if you buy it in 100 yard rolls from them.
The wood for my cab cost $10, the fabric $5, the grille cloth I got for free from some guy who was cleaning out his shed. If I'd used polyurethane the lacquer would have cost $5. Add in screws, feet, a handle, some wire and it'd be around $150, including the speaker. I had the amp cab built for me - that cost $179, uncovered and unloaded. I figure I'm at least a little bit ahead. I enjoy making stuff though, so for now I'll continue doing it myself.
The wood for my cab cost $10, the fabric $5, the grille cloth I got for free from some guy who was cleaning out his shed. If I'd used polyurethane the lacquer would have cost $5. Add in screws, feet, a handle, some wire and it'd be around $150, including the speaker. I had the amp cab built for me - that cost $179, uncovered and unloaded. I figure I'm at least a little bit ahead. I enjoy making stuff though, so for now I'll continue doing it myself.
Re: Homemade Cabinet - No. 2
Tue Nov 30, 2010 5:51 pm
Nice work Jamie! Glad to hear I helped motivate you, I'm hoping this thread does the same for me 
It's funny I've been scouring the internet looking for someone who used plain old fabric as a covering as that is how I intend to finish my 1x15 cab. Got a great deal at a local store $6 for 3 yards of upholstery, it somewhat resembles the fender type tweed, same pattern but I think it's going to come out quite a bit darker. I'll post it up when I make progress
-Dave
Re: Homemade Cabinet - No. 2
Tue Nov 30, 2010 7:22 pm
Dave, fabric is just fine as a covering. I was originally going to scour charity shops for old tweed jackets but when for a more original look. The amp in the picture above was done a year ago and has seen a lot of gigs and rehearsals. It's still in good nick, only one dent where I bumped into the end of a staircase. My advice is to use a staple gun to hold the fabric on while the glue sets, and make sure you leave enough time for the glue to cure properly, at least 24 hours, before applying any lacquer. It's dead easy, though a bit messy. It'll probably only take you 30 minutes to cover it.
Speaking of 115 cabs, here's one I whipped up this morning whilst I was feeling crafty.

Just needs a covering and a baffle. It's a big one, 24" high, 24" wide and 12" deep. I'm waiting for the fabric to arrive, I ordered it 2 weeks ago now......
Speaking of 115 cabs, here's one I whipped up this morning whilst I was feeling crafty.
Just needs a covering and a baffle. It's a big one, 24" high, 24" wide and 12" deep. I'm waiting for the fabric to arrive, I ordered it 2 weeks ago now......
Re: Homemade Cabinet - No. 2
Tue Nov 30, 2010 8:11 pm
Great work! I was looking at that outdoor picture and noticed the white "trumpet Flower", aka Datura, aka Brugmansia tree over the fence. That is one powerful drug plant! Just don't eat the flowers; they're known to cause insanity!!! I have a few varieties in my seed archive; yeah, I'm an archivist too.
Cheers,
Will
Cheers,
Will
Re: Homemade Cabinet - No. 2
Tue Nov 30, 2010 9:35 pm
I had an inkling that plant was a hallucinogen, something about it looks that little bit sinister. I've now hatched a plan to include them in a salad if I have a dinner party 
Re: Homemade Cabinet - No. 2
Tue Nov 30, 2010 9:36 pm
Nice! good work Jamie and quick too, that's hilarious about the tweed jackets thing, I had the same idea, then thought about just picking a different fabric, but came across this lump by chance.
I spent so much time on those finger joints only to have them not fit tightly and needed to pin them with nails anyway, if I had gone with the butt joints I could have built two cabs by now!
The dimensions for my 1x15 are 21"x32"x11.5" although the whole lumber thing here is stupid. At the store the board says it's 12" wide but that really means 11.5" and then it actually measured 11.25" so I've some how been shorted three quarters of an inch of cabinet depth. Oh well, also trying to make a "floating baffle" i.e. only side bracings for the baffle board, attached at the corners so that it has more flex to it. Not sure exactly how this sounds as it my first attempt and I've never owned/played an amp/cab with one, that's the joy of experimenting though 
-Dave
I spent so much time on those finger joints only to have them not fit tightly and needed to pin them with nails anyway, if I had gone with the butt joints I could have built two cabs by now!
The dimensions for my 1x15 are 21"x32"x11.5" although the whole lumber thing here is stupid. At the store the board says it's 12" wide but that really means 11.5" and then it actually measured 11.25"
-Dave
Re: Homemade Cabinet - No. 2
Tue Nov 30, 2010 10:18 pm
Sucks about the lumber yards ripping you off. I got exactly, to the millimetre, what I paid for. Maybe it's because we use the metric system and it's easier to read on the tape measure....
What's your inspiration behind the floating baffle? I recall reading something recently about players in the 'jump blues' scene of the '50s loosening the baffle, but I don't think anyone had a very good explanation as to why those guys did it. Looser sound maybe?
What's your inspiration behind the floating baffle? I recall reading something recently about players in the 'jump blues' scene of the '50s loosening the baffle, but I don't think anyone had a very good explanation as to why those guys did it. Looser sound maybe?
Re: Homemade Cabinet - No. 2
Tue Nov 30, 2010 10:23 pm
Yeah, good start!
Never heard of a floating baffle either...I'll be interested to hear how that turns out!
Never heard of a floating baffle either...I'll be interested to hear how that turns out!
Re: Homemade Cabinet - No. 2
Wed Dec 01, 2010 8:28 am
I guess what I'm trying to accomplish is getting some tweed type tone out of a blackface bandmaster. A little less headroom would be nice, I bought a less efficient speaker (Weber's version of the Jensen P15P) and next week I'll be ordering a set of JAN Philips 6L6wgb tubes, so I'm hoping that will get this thing to break up prior to my ears bleeding.
The floating type was common to Tweed era amps, and I think the 65' twin reverb as well as others I'm sure. The idea is you use a thinner baffle board and attach it only at the corners, the additional flex allows the cabinet to contribute more to the overall tone. I figure if I really don't like it I can just add the other two mounting strips and screw it down.
This bit is from the Gibson website:
Baffle Construction
The board at the front of the cab to which the speaker(s) is affixed is called the “baffle.” As with every other factor so far, baffle type and construction can vary widely. A firmly affixed baffle made of relatively thick plywood (baffles are never made of solid wood), say 3/4-inch 11-ply Baltic birch (or sometimes two sheets back to back), makes for extended punch and projection, and like the quality plywood cab, gives you more of the speaker sound and less of the cab itself. A thinner baffle (and they’re found right down to sizes of 3/8-inch on some vintage amps) naturally vibrates more, and therefore produces its own soundwaves that blend in with those of the speaker cone. When such a baffle is also less firmly affixed to the front of the cab, such as with just one bolt or screw in each corner, as with the so-called “floating baffles” used in many tweed amps of the 1950s, they really get moving when the amp is cranked and roaring.
-Dave
Re: Homemade Cabinet - No. 2
Wed Dec 01, 2010 4:38 pm
Thanks for posting that bit of info Dave. Very interesting. I think I'll try it out too. It'd be a waste of a solid pine cab to not have it contribute to the tone at all.
I suppose then that the 110 I've made is a floating baffle cab as it's only fixed at the corners. However, I've used solid pine for that too, and it sounds great.
I suppose then that the 110 I've made is a floating baffle cab as it's only fixed at the corners. However, I've used solid pine for that too, and it sounds great.
Re: Homemade Cabinet - No. 2
Wed Dec 01, 2010 6:01 pm
That is interesting. My 2x12 cab has 3/4" baltic birch ply, but for the 1x12 combo cab I went with 1/2" ply, which I also think was birch..but it's fastened down pretty tightly, definitely not floating. I had intended to go with 1/2" for the 2x12, mostly to reduce weight a little, but forgot until it was too late! That's the problem with using a dado joint for the baffle...once it's in there, it's in there!